Fun With Julia and Taichi

Fun with Julia and Taichi

Strictly speaking, it’s not Sunday today. What can I say? Guilty as charged, sometimes I have fun on Saturdays as well :-)

So what happened was; I was really going to make a post this weekend about how you can start doing more advanced stuff with Pygame. You see, Pygame is by nature a CPU renderer. As you can probably imagine, this puts a pretty hard limit on just how complex and advanced you can get with it. No doubt you’ve heard about this thing called “Graphics Cards” and GPUs and how they massively help us with complex and real-time visuals. Yea. So Pygame doesn’t do that. At least not yet.

Anyway. The way we can solve that with Pygame - or one way, I should say - is to combine Pygame with modules that work natively with your GPU. You can do a search, there are dozens of them. I generally recommend ModernGL and to be honest, that’s what I was going to write about. I still will, worry not, but… I mean… look. I was sitting around and doing some research in preparation, and then I came across this thing. Taichi. And when it comes down to it I guess I’m 100% like Gollum - “ooooo shiney!”. And here we are.

So today we’ll be looking at ModernGL Taichi. Deal with it. It’ll be fun :-)

So what is Taichi?

Well, according to The Taichi Website:

Taichi is a domain-specific language embedded in Python that helps you easily write portable, high-performance parallel programs.

You can explore the site on your own, I’ll just dot down a few (simplified) highlights of how you can think about it.

  • It hides away the inner details of how to achieve fast parallel computing
  • Parallel computing; if you’re thinking CUDA cores and GPUs, you’re on the right track
  • While we’re using a Python front, behind the scenes Taichi runs high-speed native code to whatever platform you’re on
  • The code you create will run on Windows, MacOS, Linux, mobile devices, whatever. Run it on your QNAP for all it cares, though don’t expect a GPU there ;-)
  • It’s integrated with other popular frameworks in the Python ecosystem (for machine learning, maths, and so on)

Right. So anyway. When exploring a new framework or a new language, what do we do? We create “Hello World” of course.

And that’s where things got really interesting.

Hello World with Taichi

So when you have a high-performance parallel computing bells and whistles framework you want to introduce, do you really think printing out the letters “hello world” is going to impress anyone? No, I wouldn’t think so.

Right. So how about rendering out a fractal then? Fractals are fun. They’re enjoyable to look at (well… if you’re sufficiently geeky inclined I suppose. Guilty, once again, as charged.), and they can easily put even the best modern computers into a state of frustration due to the computational requirements.

Digress

My first encounter with Julia (and her brother, Mandelbrot) was in the early 90s. I was reading about fractals and was happily chippin’ away in C on my trusted Amiga 500, implementing the formulas and necessary calculations involving Imaginary Numbers without really knowing what they were or how they worked. I still don’t by the way. Rendering out Julia or Mandelbrot in what must have been something like 320x320 pixels took a good solid while. I can’t remember the exact numbers, but probably around 30 minutes or so, at 128 max iterations. If someone had told me back then, that I would be one day rendering it out in real-time at 60 FPS, I’m not at all convinced I would have believed them.

Getting Started with Taichi

First, make sure you have the Taichi module installed. Easily done:

1
pip install taichi

Job done. Then fire up VSCode (or… you know… whatever you prefer).

Then let’s import Taichi and initialise it. Instruct Taichi to use GPU architecture (where possible). Make those CUDA cores work for you.

1
2
3
import taichi as ti

ti.init(arch=ti.gpu)

And now, let’s set up the basics for preparing to render the Julia set. We’ll define a few constants for you to play around with later, and create an array to hold our “canvas” or “surface” or “screen buffer” or “drawing area” or whatever term you prefer. A two dimensional array. Taichi uses a rectangle with a 2:1 aspect ratio as their default “Hello World” example; we’ll do the same here.

1
2
3
4
dim = 768
max_iterations = 100 # increase for higher level of detail
timestep = 0.0075 # increase for faster animation
pixels = ti.field(dtype=float, shape=(dim*2, dim))

Notice that our “pixels” array will be of the Taichi type “field”. This is because we need the array to be allocated by Taichi in whatever memory space that is most appropriate to the underlying architecture used. Since this is GPU in our case here, the array will be allocated directly on the GPU VRAM. At least I think so. Oh, and for “field” think “corn field”, not “form field” :D

The array we create, will in this case be 1536x768 pixels. Adjust as desired.

Your first Taichi function

Right. Now it’s time to unlock the true power of Taichi. We’ll create a Taichi function to do the heavy lifting of calculating “a Julia pixel”. A very quick explanation of this fractal set would be something like this:

  • For every pixel on your screen/display area
  • Run “magic calculation” a number of times, up to a maximum of max_iterations
  • If your calculated number heads off towards inifinite, paint the pixel black
  • Otherwise paint the pixel in a color between black and white. 0.1 being almost fully black, 0.9 being almost fully white. 0.5 will be grey.

Super simplified. But you either roughly know how Julia works and don’t need the explanation, or you don’t and aren’t interested - in which case the above will be enough. Go check out the Wiki for the Julia set if you want to dive deepeer.

So anyway. For every pixel. And number of iterations. That means for our little set here, we’ll (worst case) need to do 1536 * 768 * 100 (max_iterations) calculations; 117.964.800 in total. ~120 million calculatios. To calculate one frame of Julia. And before this little example is done, we’ll be doing that at 60 FPS. So 7.077.888.000 calculations (worst case) will be required, every second. See where this is going? Yea. Even the best of modern CPUs will struggle to keep up with that.

So back to the Taichi function:

1
2
3
@ti.func
def complex_sqr(z):
return ti.Vector([z[0] ** 2 - z[1] ** 2, z[1] * z[0] * 2])

We instruct Python and Taichi that this is a Taichi Function by adding a decorator. Those of you familiar with c# will probably have used decorators in the past. Anyway, with that done, the syntax remains very Python’esque for the remainder. Inside the function we’re basically performing the Julia fractal calculation which involves calculating the squares of Imaginary Numbers. This is the process we repeat over and over, to determine the pixel colour.

And here’s the thing. Behind the scenes, Taichi will be running this as what is known as a “Compute Shader”. This is a huge topic that I won’t be covering today but in a very simplified way, you can think of this as “code that will run in parallel on the GPU for each pixel on the screen”. Very simplified, but let’s move on.

Drawing the Julia set

With our function in place, it’s time to build our loop that will draw out every pixel we need. Once again we need a Taichi decorator to tell Python and Taichi what’s what. And as before, we expect this code to be running directly on the GPU, since there’s no way our CPU could ever keep up with what we’re doing here.

1
2
3
4
5
6
7
8
9
10
11
@ti.kernel
def draw(t: float):
# now we loop over our pixels/field. This is parallelized.
for i, j in pixels:
c = ti.Vector([-0.8, ti.cos(t) * 0.2])
z = ti.Vector([i / dim - 1, j / dim - 0.5]) * 2
iterations = 0
while z.norm() < 20 and iterations < max_iterations:
z = complex_sqr(z) + c
iterations += 1
pixels[i, j] = 1 - iterations * 0.02

At the risk of disappointing, I won’t actually go into much detail here. The calculation itself is “well known” in the sense that it looks like any other Julia calculation you can find anywhere. Boiled down and distilled, this is what is going on:

  • Set up the loop over our pixels “field”
  • Initialise the Julia Imaginary Numbers
  • Set up the iterations loop, and loop up until a maximum of max_iterations have run
  • Run our complex_sql() Taichi Function inside the loop
  • Put a colour back in our pixels array based on the number of iterations we actually ran

At the end of this, we now have an array of pixel colours sitting in VRAM/GPU memory. All we now have left to do, is get those pixels up on our screen somehow.

1
2
3
4
5
6
7
8
gui = ti.GUI("Fun with Julia", res=(dim*2, dim))
t = 0.0

while not gui.get_event(ti.GUI.ESCAPE, ti.GUI.EXIT):
draw(t) # Call our Taichi "draw" function defined above
t += timestep
gui.set_image(pixels) # Move our pixels array to our screen (gui)
gui.show() # and show it

Happy Sunday! :-)

Or Saturday. Or whatever.

That’s it, basically :-)

Needless to say I suppose, but this only scratches the very surface of what you can do with Taichi. I do encourage you to take a look at some of their examples or play around with some of the parameters in our example here.

And have some fun with it! :-)

You can find this code in my Python Github repo

Share

Introducing Python, Pygame, Pymunk, and Code For Fun Sundays

Introducing Python, Pygame, Pymunk, and Code For Fun Sundays

Sometimes I like to go back to how it all started for me. Playing around with code, making things happen on the screen. Chasing down new discoveries as I learned them and letting these discoveries lead me down whatever rabbit hole they would.

I learned coding for fun. I wasn’t driven by any specific objectives. I had no particular goals in mind. I just enjoyed the creative process of it, making things happen, expanding my knowledge and therefore my control over the things I could make my computer do.

12 years old, I was. When my parents gave me my first computer for Christmas. A Commodore 64. And let me tell you, it was THE BOMB back in the day :D

It wasn’t until about a year or so later, I started hanging with all the “wrong” sorts of people. Other computer enthusiasts (yes you can say it… geeks) like myself, at our local computer club. Imagine that - a computer space where people would actually meet up. In person. And exchange ideas and experiences (and erm… software). And a lot of showing off. “Look what I can make my computer do!”.

This set me off, I guess. I started picking up and picking apart what the others had been coding - most of them years older than me. Over the years that followed, I learned assembly language (6510 ASM) by mostly looking at other people’s code, tweaking and modifying it, evolving it and “making it mine”. Nothing but the trusted C-64 Reference Guide to support me - there was no such thing as Internet Tutorials, Websites, or anything of the sort back then.

Anyway. This post isn’t supposed to be a trip down memory lane. I have a point I’m getting to. I found that; when learning something entirely new - the easiest thing for me to do, is STILL to follow the above approach. Start messing about with it, no particular goal in mind. Adapt what other people have already done (standing on the shoulders of giants, and so on), take it apart, reassemble it, make it my own.

So when I recently decided; “hey let’s find out what this Python thing is all about”… well this is what I did.

And I’m now sharing this story with you.

Why Python?

Why not? :D

In Stack Overflow’s 2022 Developer Survey Python comes up as rank 6. For comparison C# is #10, HTML/CSS #14, Javascript #16. Lots and lots of people around the world use Python.

Python is also generally recognised as the primary language of choice for AI development; there are a large collection of libraries dealing with machine learning and data science readily available.

And it runs everywhere. On anything. It’s very easy to learn.

And it’s just for fun. Learning new languages, any language really, will broaden your perspective and horizon. Even if you’re not going to be coding Python in your day-to-day job.

Introducing Pygame

Back to the roots. I was originally driven by making things happen on screen. And I don’t mean buttons and dropdowns and sliders; I get more than enough of that in my daily life. No, I’m talking about colours, movement, interactions, effects. Fun stuff. And for this reason it was natural for me to start my Python adventures by looking into Pygame.

Pygame is a cross-platform set of Python modules designed for writing video games. It includes computer graphics and sound libraries designed to be used with the Python programming language.

Graphics. Sound. Here we go. Come on, follow me along. Fire up Terminal or Powershell and get going with these simple steps ;-)

winget install python

Then restart your Terminal. Slightly different approach for MacOS (but everything in this post should work just the same). See: https://www.dataquest.io/blog/installing-python-on-mac/ or here for a Homebrew approach: https://docs.python-guide.org/starting/install3/osx/

Now let’s add a few modules we’re going to need. For this we use ‘PIP’. PIP is the package manager of choice for Python; so like NPM for NodeJS and Nuget for dotnet.

pip install pygame
pip install numpy
pip install moderngl
pip install pymunk

Test that everything is working

py

Which will give you a prompt. You are now coding Python directly in your console window. Type in the following:

print('hello world')

Python will respond, unsurprisingly, with “hello world”. Excellent. You are now a Python developer. Press CTRL-Z (EOF) and ENTER to exit your interactive Python session.

Our first pygame

Now let’s get going with our first pygame.

code mygame.py

Initialising pygame

VSCode should prompt you to install the extensions for Python. I highly recommend you do. And now for some code:

# Basic 101 of setting up an empty pygame project
import pygame as pg

RESOLUTION = W, H = 1280, 1024
FPS = 60

pg.init()
surface = pg.display.set_mode(RESOLUTION)
clock = pg.time.Clock()
pg.display.set_caption('Hello World!')

Not a whole lot going on, I imagine the code should read fairly easily if you’ve ever developed in any computer language in the past. Pygame is imported and given the shorthand pg for ease of use, a variable tuple RESOLUTION is defined and also split out into the variables W and H. FPS is set to 60, we won’t be dealing with more details around that for now.

Then pygame is initialised, the pygame “surface” is set to the resolution we defined (so basically, the pygame window). We set the title of our pygame window. And we’re off to the races.

The pygame loop

And now we just need our main loop; keeping pygame running until we close our window.

never_gonna_give_you_up = True

while never_gonna_give_you_up:
    # Draw whatever
    surface.fill(pg.Color('black'))

    # Listen for events (keyb, mouse, etc)
    for i in pg.event.get():
        if i.type == pg.QUIT:
            never_gonna_give_you_up = False

    # flip the buffers. We're always drawing to the off-screen buffer.
    pg.display.flip()
    clock.tick(FPS)

Again, I don’t imagine there being too many surprises here. We fill our pygame surface with the colour black. Then we listen for incoming events, specifically the pg.QUIT event which tells us, it’s time to go.

And that’s it. The “Hello World” of pygame. Not much to look at, is it? :D

Find the complete source code at pygame-hello.py

Adding pymunk

But we’re not quite done. For this Sunday, I wanted to mess around with pymunk as well.

Pymunk is a easy-to-use pythonic 2d physics library that can be used whenever you need 2d rigid body physics from Python.

Fortunately, pymunk is very easy to introduce. First, we need to import the library.

import pygame as pg
import pymunk.pygame_util

Pymunk works with a lot of different Python libraries, so we’re specifying here that we want the pygame integration of pymunk.

Then we need to tell it, what’s up and what’s down. Yes I’m not kidding :D Perhaps a little explainer is in order.

In school when you learned maths, you no doubt worked at some point with graphs and curves. You drew these in a coordinate system. Something like this:

Y
|
|
|
|
|
|--------------------X

Where 0,0 would be the bottom left.

Pygame is different. It follows “screen space” where 0,0 is address 0 of the screen memory and therefore in the top left corner. As Y increases, we move downward. This is fine, we just need to tell pymunk about it.

pymunk.pygame_util.positive_y_is_up = False

And then after we’ve defined our pygame surface area, we need to let pymunk know about it.

draw_options = pymunk.pygame_util.DrawOptions(surface)

And with this; pygame and pymunk are now integrated. Now all we need to do, is set up pymunk’s simulation space.

space = pymunk.Space()
space.gravity = 0, 2000

Our new initialisation code, including pymunk, now looks like this:

import pygame as pg
import pymunk.pygame_util

pymunk.pygame_util.positive_y_is_up = False

RESOLUTION = W, H = 1280, 1024
FPS = 60

pg.init()
surface = pg.display.set_mode(RESOLUTION)
clock = pg.time.Clock()
pg.display.set_caption('Hello World with pymunk physics!')

draw_options = pymunk.pygame_util.DrawOptions(surface)

space = pymunk.Space()
space.gravity = 0, 2000

As for the main loop itself, we just need to add a little bit of code. To make sure the pymunk engine ticks along nicely with us.

space.step(1/FPS)
space.debug_draw(draw_options)

We “step” the engine forward relative to our frame update speed. And then for now, dump the output to our draw surface that we linked above.

Main Loop now looks like this:

never_gonna_give_you_up = True

while never_gonna_give_you_up:
    surface.fill(pg.Color('black'))

    for i in pg.event.get():
        if i.type == pg.QUIT:
            never_gonna_give_you_up = False

    space.step(1/FPS)
    space.debug_draw(draw_options)

    pg.display.flip()
    clock.tick(FPS)

Find the complete source code at pymunk-hello.py

Testing that everything works

What good is a graphics library and a physics engine, if all we can see is a black screen? I completely agree. Let’s do something with it.

After initialising my pymunk space, I’m going to drop in a couple of objects to it. A ball, and a floor for the ball to land on. Very simple stuff.

Our ball, a pymunk dynamic object

I’ll add a ball to the space. Strictly speaking it’s a circle, since we’re operating entirely in 2D space here.

ball_mass, ball_radius = 1, 60
ball_momentum = pymunk.moment_for_circle(ball_mass, 0, ball_radius)
ball_body = pymunk.Body(ball_mass, ball_momentum)
ball_body.position = W // 2, 0 # Place ball at the center/top of our space
ball_shape = pymunk.Circle(ball_body, ball_radius)
space.add(ball_body, ball_shape) # Now add it to our physics space

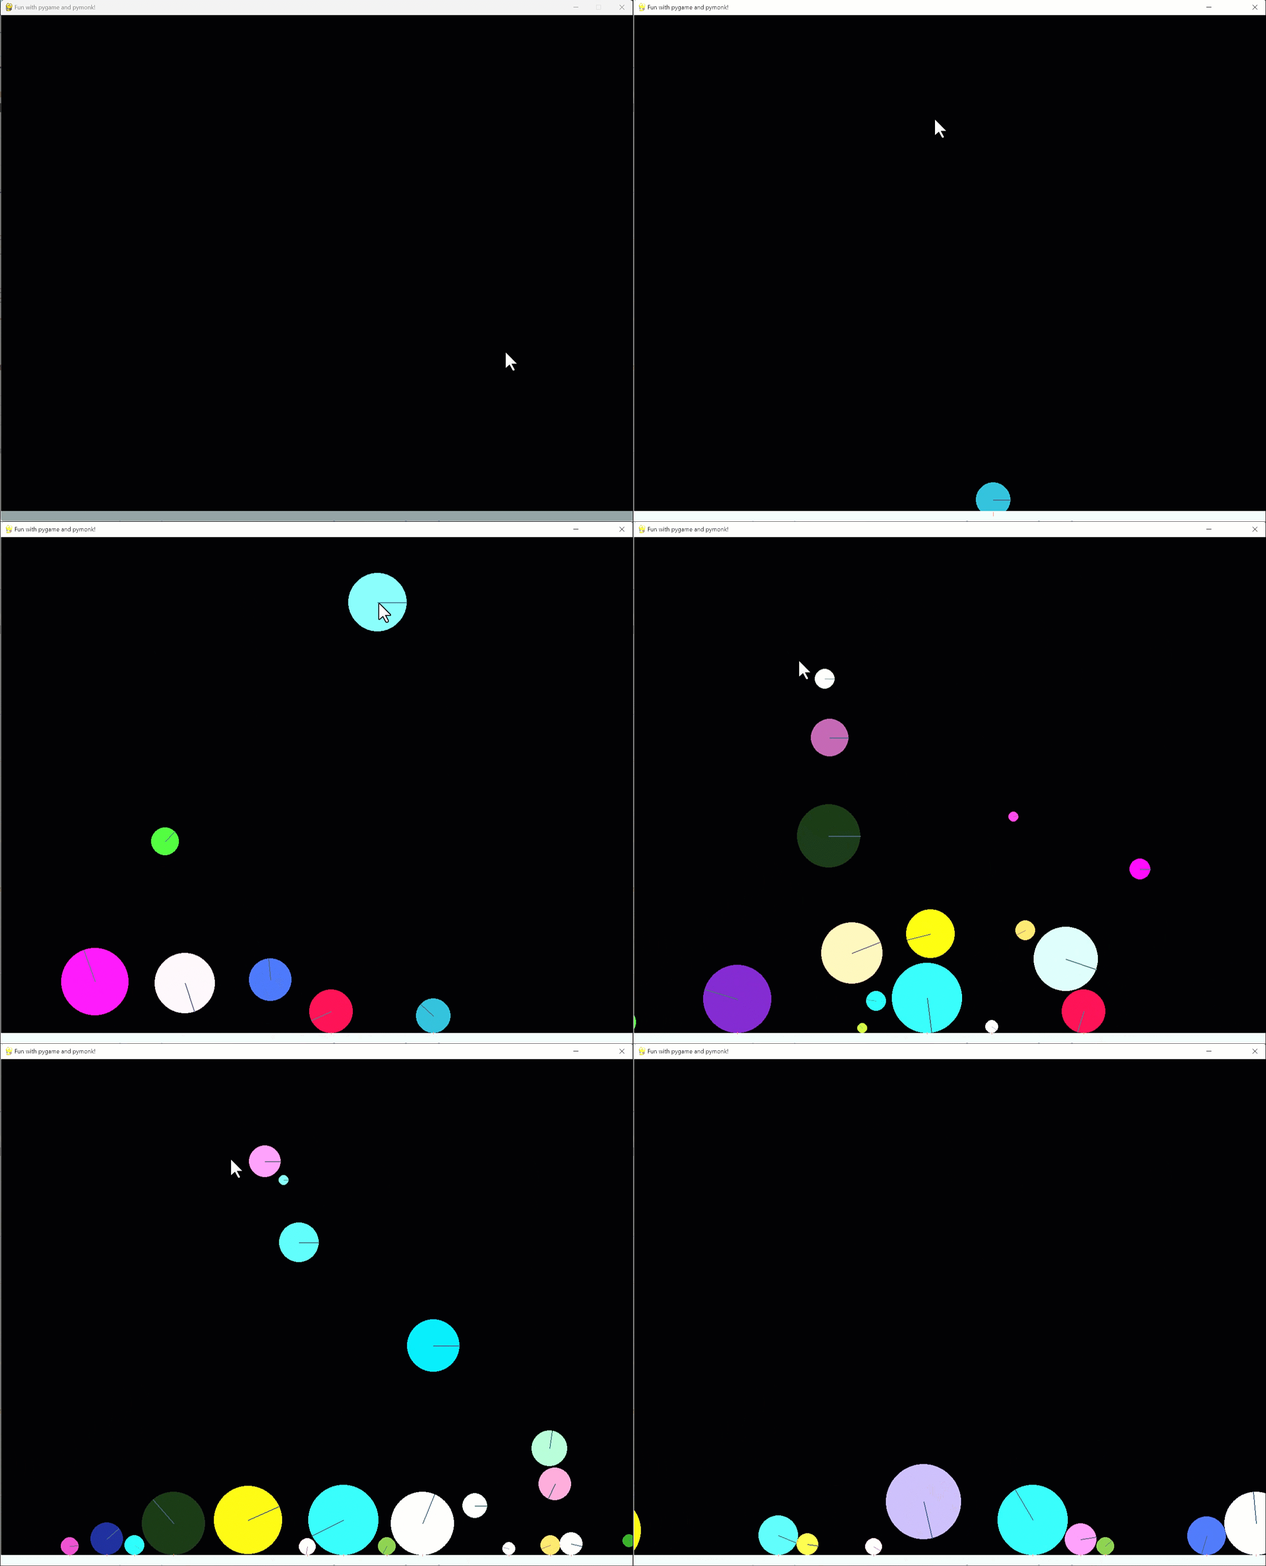
You can run the code at this point. You’ll see the ball appearing at the top center of the surface and then quickly and rather disappointingly drop through the bottom.

Our floor, a pymunk static object

So let’s add a floor as well.

segment_shape = pymunk.Segment(space.static_body, (0, H), (W, H), 20) 
# Shape is a line (segment) starting at 0, H (0,1024) ending at W, H (1280, 1024) 
# with a thickness of 20
space.add(segment_shape)

Much better. Our ball now stays with us. You might be expecting the ball to bounce off the floor. Not at all unreasonable. For this, all we need to do is tell pymunk a little bit about the elasticity of our objects.

segment_shape.elasticity = 0.8
ball_shape.elasticity = 0.8

And we’re off to the races again. Things are working.

Now for some fun

Having gone through all the “hard” work of setting up pygame and pymunk, it’s time to see what we can do with it. I’m gonna start with something relatively simple, but I highly encourage you to mess around with this example and come up with something of your own. Go crazy. Share it.

Expanding upon everything we’ve done so far, let’s make just a few more changes. First; let’s extract the code for generating and adding our ball to our space into a method of its own. Then we can add lots and lots of them. We’re also going to need some random numbers, so up top add the following:

from random import randrange

And then

def create_ball(space, pos, radius=60):
    ball_mass, ball_radius = radius/5, radius
    ball_momentum = pymunk.moment_for_circle(ball_mass, 0, ball_radius)
    ball_body = pymunk.Body(ball_mass, ball_momentum)
    ball_body.position = pos
    ball_shape = pymunk.Circle(ball_body, ball_radius)
    ball_shape.elasticity = 0.8
    ball_shape.friction = 0.5
    ball_shape.color = (randrange(0,255), randrange(0,255), randrange(0,255), 255)
    space.add(ball_body, ball_shape)
    

The only new concepts introduced here would be the friction (surface friction of our ball, how it influences other objects it interacts with) and spawning our balls with random colours.

Now let’s add some spawning functionality. For this, let’s listen to the mouse events and use them to spawn a new ball of a random size and colour whenever the user presses the left mouse button. Add the following to our event loop:

# When user clicks left mouse button, a ball of random size and color is spawned on the location
if i.type == pg.MOUSEBUTTONDOWN:
    if i.button == 1: # button 1?  (left)
        create_ball(space, i.pos, randrange(10, 80))

Whee. Off we go.

Find the complete source code at fun-with-pymunk.py

Happy Sunday! :-)

And that’s it.

The shoulders of giants I stood on, for my very initial introduction to these concepts can be found here. https://www.youtube.com/watch?v=-q_Vje2a6eY

As this series moves along, I’ll be adding my examples to this GitHub repo. You can find it here: https://github.com/cassidydotdk/py-sics

If you want to show off your awesome creations and variations of the examples we’ve gone through here today, feel free to submit a PR. Place your variations here: https://github.com/cassidydotdk/py-sics/tree/main/hello-world/community

Have a great day! :-)

Share

Running Docker inside Docker containers

Running Docker commands inside Docker containers (on Windows)

Background

Recently I’ve been doing a lot of DevOps. We’re building a Sitecore solution with all the usual suspects involved (CM, CD, xConnect, Rendering Host, SXA, MSSQL, and so on) and for lack of a better expression, we’re doing it “containers-first”. Locally we’re using Docker Desktop and upstream we’ll likely be deploying our containers to K8s or some such. I say “likely” because it hasn’t really been decided yet and isn’t relevant to this post.

For source control we’re using Azure DevOps. We also use the build and release pipelines for our Continuous Integration and other related services. In our setup, currently, “build services” is really quite simple. “Build & Deploy” can be (more or less) described as “docker-compose build” followed by “docker-compose push”.

Very simple to set up locally and in fact very simple to set up in an ADO pipeline as well.

s it. That

Locally we run a docker-compose build before docker-compose up. This works out fine, Docker’s cache layers work out fine and only the parts of our containers that have actually changed will have to go through the building process.

1
2
3
4
5
6
7
8
9
10
11
12
13
14
15
16
17
18
19
20
21
22
23
24
25
26
27
28
29
30
31
32
33
Building nodejs
Sending build context to Docker daemon 2.048kB
Step 1/11 : ARG PARENT_IMAGE
Step 2/11 : FROM $PARENT_IMAGE
---> d68e90e2df43
Step 3/11 : ARG NODEJS_VERSION
---> Using cache
---> 19ea1f7fae76
Step 4/11 : WORKDIR c:\build
---> Using cache
---> 22d9a4d05bc5
Step 5/11 : RUN curl.exe -sS -L -o node.zip https://nodejs.org/dist/v%NODEJS_VERSION%/node-v%NODEJS_VERSION%-win-x64.zip"
---> Using cache
---> cbf7c0c940bf
Step 6/11 : RUN tar.exe -xf node.zip -C C:\
---> Using cache
---> b6f325cd03fb
Step 7/11 : RUN move C:\node-v%NODEJS_VERSION%-win-x64 c:\node
---> Using cache
---> 4d00caec3e8a
Step 8/11 : RUN del node.zip
---> Using cache
---> 0d394b85acaf
Step 9/11 : USER ContainerAdministrator
---> Using cache
---> 64da8941b189
Step 10/11 : RUN SETX /M PATH "%PATH%;C:\node"
---> Using cache
---> ab0ae74b0e9b
Step 11/11 : USER ContainerUser
---> Using cache
---> 3f3eeee208d0
Successfully built 3f3eeee208d0

The key thing to notice here is the repeated ---> Using cache. Docker recognises that nothing has actually changed and therefore skips the build step. The whole process for our 15 or so images takes less than 20 seconds to complete if there’s no actual steps needed.

So far so good.

Repeating the build process on a Hosted Agent in Azure

When I initially set this up in ADO I just went with a build pipeline that I guess most would just pick by default. I used a default agent from the Azure Hosted Agents pool. And this is all you need, really. I set it up, I ran it, it completed just fine. All was well, or so I thought, but then something happened.

I ran it again.

Now if you’re not aware, Sitecore bases many of its images off Windows servercore which is a fairly big image. We also have 3 images in our setup that each require their own Node installation so several NPM CI calls are happening during a full build. Building the entire set of containers on a clean machine, including downloads of gigabytes of images, takes a good half hour or so on a decent machine.

On the default Azure Hosted Agent it took from about 1 to 1.5 hours. Every. Single. Time.

And in hindsight this was obvious. The reason is caches. Or rather, the lack of caches.

Every VSTS Build Agent is essentially a fresh VM that is fired up to execute your pipeline. It comes with a set of build tooling installed. Once it is complete it’s tossed in the bin, never to re-appear anywhere again.

This of course also means, utilising the cache as we saw above? Yea that’s not happening. Every build, all base images have to be downloaded, every single image has to be rebuilt from scratch, every single NPM CI call will have to be made.

Some would maybe just accept this. Not me.

Everything we build in this project will eventually end up being hosted on an on-premise server setup, so I happened to have a perfectly fine (and idle, currently) server available. Time for an on-premise Agent Pool. The server was already configured with basic Docker tooling (Windows Server 2019, not that it matters for this). You could just as easily provision an Azure VM to take the role of the “server” for everything I describe next.

Setting up an On-Premise ADO Agent

Setting up an on-premise agent is surprisingly simple.

  • Create a PAT - a Personal Access Token
  • Download and configure the agent (essentially you’re provided with a PowerShell script to run on the server)
  • Run the agent (optionally configure it as a service)

All of this is described in a number of articles online, I won’t go into more detail here.

I followed the steps, switched my pipeline to use this newly configured agent, and voila. Building was now back to how I wanted it with build times averaging about 4-5 minutes (after the initial run had been completed).

I then proceeded to configure an additional Agent Pool (for the upcoming Release Pipeline) and that’s where things got a little annoying. The scripts provided are a little fidgety (but workable enough) when wanting to run multiple agents. But more importantly; having our project now rely on some scripts being executed on a server, a service running to be monitored with new tooling, installation documentation. Yea. I wasn’t really having that; everything else in the project was to be a simple, flexible, scalable, deployable set of containers. Why should this be any different?

Setting up a Docker based On-Premise ADO Agent

So I went down a rabbit hole. My goal was to build an image that would be able to run Docker commands (primarily docker-compose build), multiple instances (agents) could be easily spun up, and I would be able to replicate the entire setup in mere minutes should our (not yet stable) servers change or for whatever reason. For me this is sort of the whole point of containers in the first place.

I started here Run a self-hosted agent in Docker. In short, you create a very simple DockerFile and configure the container to run a script. The script is a modified version of the scripts used to configure the on-premise agent (which is not surprising). When built, you fire up the container with something like

docker run --restart always -d -e AZP_AGENT_NAME=DockerBuildAgent01 -e AZP_POOL="On Premise Build Agents" -e AZP_URL=https://dev.azure.com/yourproject/ -e AZP_TOKEN=yourPAT yourproject.azurecr.io/vsts-agent:latest

This took very little time to set up. After a minute or so after running this, the new Agent showed up in my Agent Pool. Magic. I was now running an on-premise ADO Build Agent on my local machine inside a Docker container on my work machine which is in turn a Virtual Machine running off my Windows 10 host PC. Isn’t IT great? ;-)

Anyway. I added some Docker to the mix. With a little help from our friends at Chocolatey, my DockerFile now looked like this:

1
2
3
4
5
6
7
8
9
10
11
12
13
14
15
# escape=`

ARG BUILD_IMAGE

FROM ${BUILD_IMAGE}

SHELL ["powershell", "-Command", "$ErrorActionPreference = 'Stop'; $ProgressPreference = 'SilentlyContinue';"]

RUN Set-ExecutionPolicy RemoteSigned -Force; Set-ExecutionPolicy Unrestricted -Force; [System.Net.ServicePointManager]::SecurityProtocol = [System.Net.ServicePointManager]::SecurityProtocol -bor 3072; iex ((New-Object System.Net.WebClient).DownloadString('https://chocolatey.org/install.ps1'))
RUN choco install docker -y
RUN choco install docker-compose -y

WORKDIR /azp
COPY start.ps1 .
CMD powershell .\start.ps1

My Agent was now Docker-capable.

I fired it up again and ran another build.

Turns out, running Docker inside a Docker container is not so straight forward

Which in hindsight is obvious and I don’t know why I was so overly optimistic going into this at all :D

When my build fired, I was instantly greeted with this rather cryptic error message.

1
2
3
4
5
6
7
8
9
10
11
12
13
14
15
16
17
18
19
20
21
22
C:\ProgramData\chocolatey\bin\docker-compose.exe -f C:\azp\agent\_work\1\s\docker-compose.yml -f C:\azp\agent\_work\1\s\docker-compose.override.yml -p "Our Project" build --progress=plain
Traceback (most recent call last):
File "docker\api\client.py", line 214, in _retrieve_server_version
File "docker\api\daemon.py", line 181, in version
File "docker\utils\decorators.py", line 46, in inner
File "docker\api\client.py", line 237, in _get
File "requests\sessions.py", line 543, in get
File "requests\sessions.py", line 530, in request
File "requests\sessions.py", line 643, in send
File "requests\adapters.py", line 439, in send
File "urllib3\connectionpool.py", line 670, in urlopen
File "urllib3\connectionpool.py", line 392, in _make_request
File "http\client.py", line 1255, in request
File "http\client.py", line 1301, in _send_request
File "http\client.py", line 1250, in endheaders
File "http\client.py", line 1010, in _send_output
File "http\client.py", line 950, in send
File "docker\transport\npipeconn.py", line 32, in connect
File "docker\transport\npipesocket.py", line 23, in wrapped
File "docker\transport\npipesocket.py", line 72, in connect
File "docker\transport\npipesocket.py", line 52, in connect
pywintypes.error: (2, 'CreateFile', 'The system cannot find the file specified.')

After a bit of digging it turns out, this here is Docker’s (rather unhelpful, I’d say) way of telling me; “Hey yo, I can’t find the Docker Daemon”. Without getting into too much detail here, the Docker Daemon is what actually runs the show. The Docker tooling - docker.exe, docker-compose.exe and so on - talk to the Daemon whenever they want to actually do something with the images and containers.

And there was no Daemon. On my host PC, the Daemon comes from Docker Desktop. On the Windows Server, it came from the built in Docker services role. Inside my container there was neither.

I was, at this point, still being a bit naiive about it all. It seemed obvious to me that installing Docker Desktop inside the container was probably a pretty stupid idea. I then considered enabling the servercore base image I was using for Containers. Maybe that would have worked (a story for a different day perhaps), but I eventually ended up with a completely different solution. Thanks to Maarten Willebrands for the Rubber Duck assist that eventually led me in the right direction. The answer lies in this SO post; How do you mount the docker socket on Windows?.

I mentioned this above, but I didn’t actually have very much awareness of this at the time. I sort of knew there had to be some kind of API in play, but I’ve never wanted or needed to know much about the inner workings and details of it all. But I’ll try and explain what I learned.

The Docker tools speak to the Daemon via an API. Sometimes referred to as docker.sock or the “Docker Socket”. How this happens on Linux I don’t know, but on Windows this happens over something called “Named Pipes”. So when you install Docker Desktop on your Windows Machine, a Named Pipe is set up. The Docker tooling can then “talk” to the Daemon via this Named Pipe.

And, as it turns out, this Named Pipe can be shared.

Sharing your host Docker Daemon Socket (Named Pipe) with a running Docker container

DO NOT EVER DO THIS WITH A CONTAINER YOU DON’T KNOW: Giving a running container access to your host operating system is not something you should do unless you absolutely know what that container is going to do with that access. Warnings aside; if you installed an on-premise agent anyway, this isn’t really much different. So don’t worry too much about it.

So following this technique, I fired up my Docker based VSTS Agent once again.

docker run --restart always -d -v "\\.\pipe\docker_engine:\\.\pipe\docker_engine" -e AZP_AGENT_NAME=DockerBuildAgent01 -e AZP_POOL="On Premise Build Agents" -e AZP_URL=https://dev.azure.com/yourproject/ -e AZP_TOKEN=yourPAT yourproject.azurecr.io/vsts-agent:latest

The “magic” here is this part; -v "\\.\pipe\docker_engine:\\.\pipe\docker_engine". Essentially I use a Docker “Volume Mount” to connect the Named Pipe docker_engine to my Docker container. Which now means, when the tooling inside my container tries to find a Docker Daemon they will find it, since I’ve just provided the one from my host PC.

Very Zen!

I fired off another build. And it worked. Profit! :D

TL;DR

Setting up an on-premise Azure Agent to do your Docker builds saves you a lot of time since Docker can use its caches when building. Our 15 or so image build takes on average around 5 minutes - end to end.

Setting up the Agent to run as a Docker container is easier to maintain. Added benefit is, you can run this Agent very easily on your own machine as well for your own hobby projects; e.g. if you’re on the free tier of Azure DevOps.

To make a VSTS Agent that can actually do your Docker builds (e.g. docker-compose build) you need Docker tooling inside the container and you need to connect the agent to your host PCs Docker Daemon.

I’ve created a Gist Setting up a Docker based VSTS Agent that can run Docker commands with a set of example files on how this can be achieved.

Enjoy! :-)

Share

Unicorn Configuration Predicate Presets

Introducing Unicorn Configuration Predicate Presets

Overview

Configuration Predicate Presets (or just Predicate Presets) is a new feature to Unicorn designed to help you get rid of a lot of configuration repetition on your projects.

If you’re following Helix guidelines for Unicorn (not saying you should but many of you are), there’s a good chance you have a flock of configuration files in your projects looking something like this:

1
2
3
4
5
6
7
8
9
10
11
12
13
14
15
16
17
18
19
/src/Features/Carousel/Carousel.serialization.config

<configuration xmlns:patch="http://www.sitecore.net/xmlconfig/">
<sitecore>
<unicorn>
<configurations>
<configuration name="Feature.Carousel" dependencies="Foundation.*" patch:after="configuration[@name='Foundation.Serialization.Base']">
<predicate>
<include name="templates" database="master" path="/sitecore/templates/Feature/Carousel" />
<include name="branches" database="master" path="/sitecore/templates/branches/Feature/Carousel" />
<include name="renderings" database="master" path="/sitecore/layout/renderings/Feature/Carousel" />
<include name="thumbnails" database="master" path="/sitecore/media library/Feature/Carousel" />
<include name="rules" database="master" path="/sitecore/system/Settings/Rules/Insert Options/Rules/Carousel" />
</predicate>
</configuration>
</configurations>
</unicorn>
</sitecore>
</configuration>

And then you would have 20 or however many similar configuration files in each of your Feature projects.

1
2
3
4
5
6
7
8
9
10
11
12
13
14
15
16
17
18
19
/src/Features/Carousel/Flyout.serialization.config

<configuration xmlns:patch="http://www.sitecore.net/xmlconfig/">
<sitecore>
<unicorn>
<configurations>
<configuration name="Feature.Flyout" dependencies="Foundation.*" patch:after="configuration[@name='Foundation.Serialization.Base']">
<predicate>
<include name="templates" database="master" path="/sitecore/templates/Feature/Flyout" />
<include name="branches" database="master" path="/sitecore/templates/branches/Feature/Flyout" />
<include name="renderings" database="master" path="/sitecore/layout/renderings/Feature/Flyout" />
<include name="thumbnails" database="master" path="/sitecore/media library/Feature/Flyout" />
<include name="rules" database="master" path="/sitecore/system/Settings/Rules/Insert Options/Rules/Flhyout" />
</predicate>
</configuration>
</configurations>
</unicorn>
</sitecore>
</configuration>

And so on. Your <include>s might look a bit different but you get the idea.

With a Predicate Preset defined, you could remove some of the obvious redundancy here. Following this example you could add the following to the Foundation.Serialization.Base configuration.

1
2
3
4
5
6
7
8
9
<predicatePresets type="Unicorn.Configuration.PredicatePresetHandler, Unicorn" singleInstance="true">
<preset id="Component" database="master">
<include name="templates" database="$database" path="/sitecore/templates/Feature/$name" />
<include name="branches" database="$database" path="/sitecore/templates/branches/Feature/$name" />
<include name="renderings" database="$database" path="/sitecore/layouts/renderings/Feature/$name" />
<include name="thumbnails" database="$database" path="/sitecore/media library/Feature/$name" />
<include name="renderings" database="$database" path="/sitecore/system/settings/Rules/Insert Options/Rules/$name" />
</preset>
</predicatePresets>

And with this in place, your configurations could look like this:

1
2
3
4
5
6
7
8
9
10
11
12
13
14
15
/src/Features/Carousel/Carousel.serialization.config

<configuration xmlns:patch="http://www.sitecore.net/xmlconfig/">
<sitecore>
<unicorn>
<configurations>
<configuration name="Feature.Carousel" dependencies="Foundation.*" patch:after="configuration[@name='Foundation.Serialization.Base']">
<predicate>
<preset id="Component" name="Carousel">
</predicate>
</configuration>
</configurations>
</unicorn>
</sitecore>
</configuration>

And

1
2
3
4
5
6
7
8
9
10
11
12
13
14
15
/src/Features/Carousel/Flyhout.serialization.config

<configuration xmlns:patch="http://www.sitecore.net/xmlconfig/">
<sitecore>
<unicorn>
<configurations>
<configuration name="Feature.Carousel" dependencies="Foundation.*" patch:after="configuration[@name='Foundation.Serialization.Base']">
<predicate>
<preset id="Component" name="Flyout">
</predicate>
</configuration>
</configurations>
</unicorn>
</sitecore>
</configuration>

Better, yes?

But it doesn’t end there. How about this:

1
2
3
4
5
6
7
8
9
10
11
12
13
14
15
16
17
18
19
20
21
22
23
24
25
26
27
28
29
30
31
/src/Foundation/Serialization/Features.Components.serialization.config

<configuration xmlns:patch="http://www.sitecore.net/xmlconfig/">
<sitecore>
<unicorn>
<predicatePresets type="Unicorn.Configuration.PredicatePresetHandler, Unicorn" singleInstance="true">
<preset id="Component" database="master">
<include name="$name.templates" database="$database" path="/sitecore/templates/Feature/$name" />
<include name="$name.branches" database="$database" path="/sitecore/templates/branches/Feature/$name" />
<include name="$name.renderings" database="$database" path="/sitecore/layouts/renderings/Feature/$name" />
<include name="$name.thumbnails" database="$database" path="/sitecore/media library/Feature/$name" />
<include name="$name.renderings" database="$database" path="/sitecore/system/settings/Rules/Insert Options/Rules/$name" />
</preset>
</predicatePresets>

<configurations>
<configuration name="Components" dependencies="Foundation.*">
<predicate>
<preset id="Component" name="Carousel">
<preset id="Component" name="Flyout">
<preset id="Component" name="CTA Banner">
<preset id="Component" name="Header">
<preset id="Component" name="Header Navigation">
<preset id="Component" name="Footer">
<preset id="Component" name="Sidebar">
</predicate>
</configuration>
</configurations>
</unicorn>
</sitecore>
</configuration>

Now that’s more like it. This is more in line with how I recommend using and implementing Unicorn. Minimise the project clutter, don’t mix serialisation configurations all over the place, and don’t mix your Unicorn serialised content with Visual Studio project assets. I know right?, gasp and so on. You are free to choose your own path obviously :-)

A closer look

So Predicate Presets works as an extended Configuration Parser. What that means is, that the preset handling happens when a configuration loads.

So if I have a Predicate Preset defined such as:

1
2
3
<preset id="Component" database="master">
<include name="templates.$name" database="$database" path="/sitecore/templates/Feature/$name" />
</preset>

And use it in a Configuration like:

1
2
3
4
5
<configuration name="Components" dependencies="Foundation.*">
<predicate>
<preset id="Component" name="Carousel">
</predicate>
</configuration>

When that configuration loads and is exposed to Unicorn, Unicorn will see it like this:

1
2
3
4
5
<configuration name="Components" dependencies="Foundation.*">
<predicate>
<include name="templates.Carousel" database="master" path="/sitecore/templates/Feature/Carousel" />
</predicate>
</configuration>

And from that point on, everything is as it has always been.

The important take away from this is, that you must include some sort of variant in the name attribute inside your Predicate Preset. If you don’t, Unicorn is going to get angry with you.

If I had done this:

1
2
3
<preset id="Component" database="master">
<include name="templates" database="$database" path="/sitecore/templates/Feature/$name" />
</preset>

And then this:

1
2
3
4
5
6
<configuration name="Components" dependencies="Foundation.*">
<predicate>
<preset id="Component" name="Carousel">
<preset id="Component" name="Flyout">
</predicate>
</configuration>

This is what would arrive at Unicorn:

1
2
3
4
5
6
<configuration name="Components" dependencies="Foundation.*">
<predicate>
<include name="templates" database="master" path="/sitecore/templates/Feature/Carousel" />
<include name="templates" database="master" path="/sitecore/templates/Feature/Flyout" />
</predicate>
</configuration>

And that would be invalid configuration. And we don’t want that.

I recommend doing your Predicate Presets something like this:

1
<include name="$id.templates.$name" database="$database" path="/sitecore/templates/Feature/$name" />

Token handling

As for the tokens, it’s actually as simple as it looks. The Predicate Preset Parser will - generally speaking - take attributes from the preset definition and use them as tokens when expanding the Predicate Preset. This is probably best explained with a few examples.

1
2
3
4
5
6
7
<preset id="Component" database="master">
<include name="templates.$name" database="$database" path="/sitecore/templates/Feature/$name" />
</preset>

<predicate>
<preset id="Component" name="Carousel">
</predicate>

From this, the Predicate Preset Parser will first try and resolve $database from <preset id="Component" name="Carousel"> but there is no database attribute to be found. It will then look to the Preset Predicate Definition <preset id="Component" database="master"> and find database="master". So $database becomes master and this is then replaced using simple string substitution on all attribute values in the preset.

So <include name="templates.$name" database="$database" path="/sitecore/templates/Feature/$name" /> becomes <include name="templates.$name" database="master" path="/sitecore/templates/Feature/$name" />

The process is then repeated for other tokens, in this case $name. The important take away here is, you are completely free to come up with as many attributes as you want or need.

An example could be:

1
2
3
<preset id="Component" database="master">
<include name="$id.templates.$name" database="$database" path="/sitecore/templates/Feature/$group/$name" />
</preset>

Which could then be used as:

1
2
3
4
5
6
<predicate>
<preset id="Component" name="Carousel" group="Banners">
<preset id="Component" name="Flyout" group="Navigation">
<preset id="Component" name="Content With Image" group="Content">
<preset id="Component" name="Content Without Image" group="Content">
</predicate>

The system is very flexible and I’m sure you can think of better uses of it than I can, I’m mostly focused on explaining all of this and writing this post ;-) I could easily see this being used in for instance SXA, with tokens like $tenant and $site.

In summary

Predicate Presets can help you avoid configuration duplication and keep consistency in your solution. It makes for much easier configuration setup and maintenance and provides you with a much better overview of what you have going on in your solution. Especially so, if you take my recommendation and turn the dial way back on the number of configuration files you have in your solution.

If you find Predicate Presets useful and you put them to good use in your projects, don’t be shy. Reach out to me and share what you’re doing. I would love for Unicorn to ship with some of the best and most widely used Predicate Presets out of the box. Especially if you come up with ones of general use for JSS and SXA projects for instance.

Enjoy :-)

Share

Some thoughts about working from home

Some thoughts on working from home

Seems particularly relevant to share at this point in time.

Over the past 10 years or so, I would say about 7 of them have been spent working from home. Or “working remotely” as some (especially clients) prefer to call it. During that time I’ve learned a lot; about what makes it work and what doesn’t. I figure I might as well share some of this.

I will not be covering all the talking points, stigma and reasoning that goes into discussing WfH, pros, cons, and so on. Not in this post anyway.

To successfully work from home, here’s a few things you should consider.

The Workspace

For people who’ve not tried it, WfH seems like a great idea. “Great! I get to stay at home all day. I can just sit in my pyjamas on the couch, watch some Netflix while answering emails and getting stuff done.”

Yea… no. Doesn’t really work like that.

Sitting on the couch all day while working on a laptop would quickly make your spine want to crawl out of your body. Keeping Netflix or other distractions running would drive your productivity down to near nothing. Staying in your pyjamas… Not really sure about that one. But I wouldn’t go video conferencing in that attire. Please get dressed before attending team video calls. I feel I have to stress this. I speak from experience.

No what you need is a proper workspace. In your home. I realise this might mean something different to a lot of different people. What’s important here - just as it would in an office space at your place of work - is that you have a proper desk, a proper chair (no, your kitchen or dining room chairs just aren’t going to cut it in the long run), and all the things that go with it. Proper lighting.

Now keep in mind, WfH is what I do. I’m not saying your setup needs to be maybe quite this elaborate. But I’m also saying, don’t underestimate the tools you need to do your work effectively. Dual monitor setups have proven their value time and again. At least get one proper monitor, don’t try and work from that 13” or 15” screen directly off your laptop.

I would also never go without a proper keyboard and a mouse. As anything I ever write these are personal opinions, feel free to not share them. But I find it a very worthwhile investment.

The Room

My home office is in a dedicated room of my house. If at all you have that option, definitely go with that. But I do realise this is not an option for everyone or probably not even a majority.

Second best would be to set up somewhere in your abode that you can dedicate as a workspace. Dining room table just isn’t going to hack it in the long run unless you live alone or you are always home alone while working. I’ll cover that in a little bit more detail further down.

Make sure whatever space you choose is well ventilated, well lit, supports you in all the right ways when seated.

Ideally find a location where you can close the door but if that is not an option, go for something where at least some kind of “divisor” can at least map out the semblence of a marked space “for working”.

Your Workday

While WfH does allow for a more fluent work schedule, try and stick to a work schedule that matches that of your co-workers. While it is perfectly acceptable (in most cases) that you reap some of all the benefits WfH gives you (being able to pick up the kids from school, go for a jog, whatever), you owe it to yourself and your co-workers to let your schedule be known and transparent.

The latter is very important. I feel I have to stress this as well.

WfH is based on a whole lotta trust, and mistrust is one of the main reasons employers give (although they use different wording… believe me, it’s mistrust) for not allowing everyone who can on their workforce to do it.

And once you have a schedule, stick to it. For your own sake. Believe me, I’ve been down the road of “Ugh it’s Monday morning… I can start a little bit later today”. And you can. But it’s a very slippery slope and soon you find yourself working until 8 or 9 in the evening to catch up. While this can be fine on occasion, I doubt you will get many stamps of approval from your partner for this type of thing.

If you are away from Teams, Slack, Hangouts, or whatever means of team communication you and your co-workers share for extended periods of time, sooner or later someone is going to come asking questions. Don’t take this to mean, you absolutely must respond to every incoming communication right away - you could be deeply immersed in problemsolving something (common for developers). But be there for your team mates. Be there for your co-workers. Set that “Away” status (Away 2 hours: Gone Hiking) and let the world know what they cannot see since you’re not all in the same office.

While we’re at it, don’t call. Just don’t. Discover the wonderful life of asynchronous messaging that these collaboration platforms provide. Don’t force yourself on another person with a call unless it has been scheduled and agreed in advance.

The Team Call

Whether it’s for Daily Standup or any of the other frequent Scrum Ceremonies that is being played out, for the love of all things please learn to use your very basic communication tools. You need to understand how to work your microphone, and (optionally) your webcam.

It really isn’t that difficult.

Know that person who always shows up to team meetings? “Can you guys hear me? Wait, I can’t hear you. Let me try reconnecting. Hold on while I restart my PC”. Yea. Don’t be that person.

This post isn’t a tech tutorial. But once you set up at home, spend 30 minutes with this. Try things out with a colleague, in a “safe” environment. Make sure you know the ins and outs of this very basic gear.

And once you’re on the call, mute yourself (well your microphone) when not actively speaking. And don’t forget to unmute when you want yourself to be heard. Believe me, no one is interested in the traffic noise from your street, the kids playing in the next (or worse; same) room. It’s all fine and novel the first couple of times but it gets old very very quick.

It’s not that your kids aren’t adorable and lovable and all that. But you probably wouldn’t bring them along normally to your office for the same reasons that apply here.

This is why it works best if you can dedicate a room as your place of work. If you’re at the dining room table, you are in essence disrupting the living space of whoever you share your home with.

Getting Stuff Done

I saved the best for last.

If you’ve been trusted to WfH, you need to be able to get stuff done. We’re very much still dealing with a managerial gap here, and if you want to continue doing it - you need to also prove it.

A lot here comes down to transparency. Not only the transparency I mentioned above about being available, but also being transparent in what you spend your time. Now I work as a consultant and always have to submit time sheets so for me this comes natural… if I can’t provide details about what I’ve been working on, odds rise very quickly that I won’t get paid.

Make your time sheets detailed enough so that whoever reads them gets some kind of idea of where your time went. Here is what I did on a random day last year.

9:30 - 12:00
Devops Tasks – Debugging problem on local which might be systemic on all environments. Someone has run the LB translator through all of the SXA media assets (stylesheets, javascript, and such) and it was causing lots of problems for the Solr indexer.

12:00 - 14:30
Programming – Further debugging. Finally a breakthrough, was able to get the GeoFluent /translate call working

14:30 - 15:00
Meetings / Status Calls – Developer Team catchup

15:00 - 15:15
Meetings / Status Calls – Daily standup

15:15 - 17:00
Programming – Working the translation api, while also doing a few calls with [redacted] around various minor things

17:00 - 19:00
Meetings / Status Calls – Grooming Session

And here is an example of a time sheet I received right around the same time.

8:30 - 16:00
Programming - navigation

Now I ask you, which one of the two inspires confidence and which one doesn’t?

Keep a detailed log of your time. You are really going to be glad you did if, all of a sudden, there are project delays (they happen all the time) and middle or upper management comes looking for heads to chop. Being able to clearly and coherently say what you’ve been spending your time on is very useful. Always.

Approach your work professionally. Now we’re back to the whole “no Netflix” thing. If you consistently aren’t getting stuff done you will quickly find yourself doing the commute to and from that office again. Or worse. Make sure you get stuff done, make sure you raise blockers at Stand Up (that’s actually what it’s there for), make sure you reach out to and communicate with your team when needed. Just as you would, if you all shared an office space.

And Enjoy the Privilege

WfH is NOT an option for everyone. There are, of course, many jobs that require direct interaction. Even in the tech industry. But if you, like me, find yourself in the category of “Knowledge Worker”, chances are that WfH can be made to work just as well - if not better - than the commute/office/commute.

As a closing note; you’ve just freed up some time. I live in Switzerland where it is fairly common that people commute anywhere from 45 minutes to 90 minutes to and from work. Well the good news is, that time is now yours.

Don’t be like me. Don’t just work more (billing by the hour is a powerful force). Use that to go for a walk. Take the dog if you have one. If not, maybe get one? I am living testament to what happens when you work from home for an extended period of time (as in, years) and don’t move around enough. From back problems to weight issues… Actually I think I’m going to go for a walk now. Spring has arrived (sort of).

You with me?

Share

Deploying and Debugging Your Visual Studio Solution to Your Sitecore Docker Containers

Sitecore Docker for Dummies

Part 3, Deploying and Debugging your Visual Studio Solutions

Now we’re getting some work done.

Special thanks to Per Bering. Without his patience with my stream of questions, this post would never have been completed this quickly.

This is part 3 in a series about Sitecore and Docker.

For this post, I am flat out assuming you know and understand how a Filesystem Publish from Visual Studio works.

Right, strap in. If you’ve followed the first two posts, you’re actually almost there. There are just a few minor tweaks that need to happen, for you to be able to fully enjoy and work with your new Sitecore Docker containers.

I’m going to be covering a lot of ground here, but I promise I’ll keep it For Dummies style. Feel free to dig deeper into any particular area of interest on your own time. The rest of us got stuff to get done ;-)

Deploying (publishing) files to your Docker container

Docker Volumes, the briefest introduction ever

A few things to get us started. The first thing to keep in mind is; that your Docker Container is static. It exists only for as long as you keep it running. Once you take it down (docker-compose down) it is gone and will come up fresh when you fire it up again. This is what I said (with some disclaimer) in previous posts, and this remains true.

But if you’ve played around with some of the examples from the previous posts you also know, this isn’t entirely true. You can create items inside Sitecore, for instance, and they’re still there when you come back. So why is that?

The answer is Docker Volumes. Something I could probably write 10 posts about and not be done; so let’s just get to the TL;DR already shall we? Open up the docker-compose.yml and let’s take a look at that SQL Server Container. It looks like this:

1
2
3
4
5
6
7
sql:
image: sitecore-xp-sxa-1.9.0-sqldev:9.2.0-windowsservercore-${WINDOWSSERVERCORE_CHANNEL}
volumes:
- .\data\sql:C:\Data
mem_limit: 2GB
ports:
- "44010:1433"

As you probably guessed, the section to pay attention to here is the volumes: one. It has one simple volume mapping - translated from Dockeresque, it reads like this:

Docker, please map my local .\data\sql folder to C:\Data inside your container

And Your SQL Server image is configured to mount it’s databases from the C:\Data folder. It really is that simple (it isn’t) in our For Dummies universe. If you’re curious, go look at D:\Git\docker-images\images\9.2.0 rev. 002893\windowsservercore\sitecore-xp-sqldev\Dockerfile and see the mapping. You’re looking for:

DATA_PATH='c:/data/' `

Ok so. The easiest way to think about this, as the mappings being SymLinks (which is not far from being true) between your Container and your native OS filesystem. Unlike a VM where you would need to copy files into it for it to store on it’s local VHD - here we just create a direct connection between the two worlds. Wormhole; but no DS-9. And The Dominion is actually called Daemon.

Right so with that out of the way, it is clear that we need to punch another hole into our Container. We need to create a link between our webroot and somewhere on our host OS - so that we can publish our solution to it.

This is actually a little more complicated than it sounds. For reasons I won’t go into here (I don’t know yet lol), you can only create a volume link between the HOST OS and an existing directory inside the container on Linux Docker, not on Windows. Bummer. Fortunately our friends maintaining the docker-images repository got our backs and have created a small PowerShell script that essentially does the following:

  • Monitor folder A for changes
  • Robocopy these with a brick tonne of parameters to folder B

All we really have to do is fire up that script inside the Container, and the basics are in place for us to get going. Back to the docker-compose.yml file.

Let’s start simple, below image: we do this:

entrypoint: cmd "start /B powershell Watch-Directory C:/src C:/inetpub/sc"

So entrypoint: is us telling Docker; “when you start, please run this”. AutoExec.bat all over again.

  • Watch-Directory is the script I mentioned above; it is already baked into your image and Container
  • c:\src is a non-existing folder in the container, and
  • c:\inetpub\sc is the default location of your webroot inside the Container.

Great. So now all we need is a volume mapping:

- .\deploy:C:\src

And we’re in business. Right? Using this, I should be able to publish my Visual Studio solution to .\deploy, and it will automagically get moved to the webroot.

And sure enough.

Publishing your Visual Studio projects to your Container

Right. This is where you do some work that I don’t even want to write about :P

Set up a blank Visual Studio Solution with a Web project in it, like you would for any Sitecore project. Or grab one of your existing projects. Or whatever. I’m going to skip from this point, straight to publishing - this post is already going to be long enough.

Also, if you’re still messing about with the test containers from D:\docker-images\tests\9.2.0 rev. 002893\windowsservercore - it’s time to move a bit. Move the following:

  • data
  • .env
  • docker-compose.xp.yml

To your solution root. Rename docker-compose.xp.yml to just docker-compose.yml. Make the below modifications to it (CD and CM server entries). Turn off any containers you may have running and from your solution root now run docker-compose up. Voila.

Here’s what your docker-compose.yml should resemble (not touching all the other stuff like Solr and SQL):

1
2
3
4
5
6
7
8
9
10
11
12
13
cm:
image: sitecore-xp-sxa-1.9.0-standalone:9.2.0-windowsservercore-${WINDOWSSERVERCORE_CHANNEL}
entrypoint: cmd "start /B powershell Watch-Directory C:/src C:/inetpub/sc"
volumes:
- .\deploy:C:\src
- .\data\cm:C:\inetpub\sc\App_Data\logs
- .\data\creativeexchange:C:\inetpub\sc\App_Data\packages\CreativeExchange\FileStorage
ports:
- "44001:80"
links:
- sql
- solr
- xconnect

And CD (we need to deploy there as well):

1
2
3
4
5
6
7
8
9
10
11
12
cd:
image: sitecore-xp-sxa-1.9.0-cd:9.2.0-windowsservercore-${WINDOWSSERVERCORE_CHANNEL}
entrypoint: cmd "start /B powershell Watch-Directory C:/src C:/inetpub/sc"
volumes:
- .\deploy:C:\src
- .\data\cd:C:\inetpub\sc\App_Data\logs
ports:
- "44002:80"
links:
- sql
- solr
- xconnect

Fortunately, the hard work is done. All you need to do now is make a Publish Profile (or use MSBuild in whatever form you fancy, gulp, Cake, whatever you want) and get your project/solution published to .\deploy.

It can look like this:

You’ve seen that before. Nothing fancy here. Run “Publish”. Then pay attention to your Docker output window. You should see something like this:

1
2
3
4
5
cm_1                         | 23:38:20:575: New File     C:\src\app_offline.htm
cm_1 | 23:38:20:590: Newer C:\src\bin\NightMAR.dll
cm_1 | 23:38:20:590: Newer C:\src\bin\NightMAR.pdb
cm_1 | 23:38:20:590: Done syncing...
cm_1 | 23:38:22:203: Deleted 'C:\inetpub\sc\app_offline.htm'...

The exact contents here will, obviously, vary greatly depending on what it is you’re actually publishing. Suffice it to say, when you see this output, Watch-Directory has done its thing and copied the contents of your .\deploy folder to the webroot inside your container(s).

Simple as.

Sooner or later though, we all mess up. That’s what we have debuggers for.

Debugging your Visual Studio Project inside the Container

So debugging your solution inside a Docker Container is not quite as simple as you’re used to. It’s not as simple as just going Debug -> Attach to process - the Container is running in its own little world of isolation.

We need to punch a hole in, once again. But this time not a filesystem one.

If you’ve ever debugged a remote IIS server, this process is exactly the same. You basically need to install a Visual Studio Remote Debugging Monitor inside the container, that Visual Studio can reach out to for the debug session. This is a lot simpler than it sounds. Let’s grab our entrypoint: once again.

entrypoint: cmd /c "start /B powershell Watch-Directory C:/src C:/inetpub/sc & C:\\remote_debugger\\x64\\msvsmon.exe /noauth /anyuser /silent /nostatus /noclrwarn /nosecuritywarn /nofirewallwarn /nowowwarn /timeout:2147483646"

So I’ve expanded things a bit. I’ve added /c to the cmd so that Watch-Directory won’t hold us up and block things. Then I add a call to C:\remote_debugger\x64\msvsmon.exe and another bucket load of parameters.

C:\remote_debugger doesn’t exist inside the Container. But we know how to solve that.

Modify docker-compose.yml once more, and make it look like this:

For CM:

1
2
3
4
5
6
7
8
9
10
11
12
13
14
cm:
image: sitecore-xp-sxa-1.9.0-standalone:9.2.0-windowsservercore-${WINDOWSSERVERCORE_CHANNEL}
entrypoint: cmd /c "start /B powershell Watch-Directory C:/src C:/inetpub/sc & C:\\remote_debugger\\x64\\msvsmon.exe /noauth /anyuser /silent /nostatus /noclrwarn /nosecuritywarn /nofirewallwarn /nowowwarn /timeout:2147483646"
volumes:
- C:\Program Files (x86)\Microsoft Visual Studio\2019\Professional\Common7\IDE\Remote Debugger:C:\remote_debugger:ro
- .\deploy:C:\src
- .\data\cm:C:\inetpub\sc\App_Data\logs
- .\data\creativeexchange:C:\inetpub\sc\App_Data\packages\CreativeExchange\FileStorage
ports:
- "44001:80"
links:
- sql
- solr
- xconnect

And CD:

1
2
3
4
5
6
7
8
9
10
11
12
13
cd:
image: sitecore-xp-sxa-1.9.0-cd:9.2.0-windowsservercore-${WINDOWSSERVERCORE_CHANNEL}
entrypoint: cmd /c "start /B powershell Watch-Directory C:/src C:/inetpub/sc & C:\\remote_debugger\\x64\\msvsmon.exe /noauth /anyuser /silent /nostatus /noclrwarn /nosecuritywarn /nofirewallwarn /nowowwarn /timeout:2147483646"
volumes:
- C:\Program Files (x86)\Microsoft Visual Studio\2019\Professional\Common7\IDE\Remote Debugger:C:\remote_debugger:ro
- .\deploy:C:\src
- .\data\cd:C:\inetpub\sc\App_Data\logs
ports:
- "44002:80"
links:
- sql
- solr
- xconnect

If you’re not running Visual Studio 2019 Professional, you will need to change that path.

Right, now we have the Remote Debugger running inside the Container. If you want to debug - I guess I shouldn’t have to say this, but I made this mistake myself 😂 - make sure you compile in debug configuration, not release in your Publishing Profile.

Attaching to the Container process is slightly different than normal however. I’ve found various guides on the net that seem to indicate it should be even easier than what I do here - but I couldn’t find any other way. And it’s not too bad actually.

First, find the IP [^1] address of your CM server.

1
2
3
4
5
6
7
8
9
10
PS D:\Git\cassidydotdk\nightmar> docker container ls
CONTAINER ID IMAGE COMMAND CREATED STATUS PORTS NAMES
e94a75230acc sitecore-xp-sxa-1.9.0-standalone:9.2.0-windowsservercore-1903 "cmd /c 'start /B po…" 2 hours ago Up 2 hours 0.0.0.0:44001->80/tcp nightmar_cm_1
cbe8748d1f17 sitecore-xp-xconnect-automationengine:9.2.0-windowsservercore-1903 "C:\\AutomationEngine…" 2 hours ago Up 2 hours 80/tcp nightmar_xconnect-automationengine_1
230a38266568 sitecore-xp-sxa-1.9.0-cd:9.2.0-windowsservercore-1903 "cmd /c 'start /B po…" 2 hours ago Up 2 hours 0.0.0.0:44002->80/tcp nightmar_cd_1
b1ab013519ea sitecore-xp-xconnect:9.2.0-windowsservercore-1903 "C:\\ServiceMonitor.e…" 2 hours ago Up 2 hours 80/tcp, 443/tcp nightmar_xconnect_1
b247ba3c33c3 sitecore-xp-xconnect-indexworker:9.2.0-windowsservercore-1903 "C:\\IndexWorker\\XCon…" 2 hours ago Up 2 hours 80/tcp nightmar_xconnect-indexworker_1
c528698ff556 sitecore-xp-sxa-1.9.0-sqldev:9.2.0-windowsservercore-1903 "powershell -Command…" 2 hours ago Up 2 hours (healthy) 0.0.0.0:44010->1433/tcp nightmar_sql_1
cfca8e1f28a7 sitecore-xp-sxa-1.9.0-solr:9.2.0-nanoserver-1903 "cmd /S /C Boot.cmd …" 2 hours ago Up 2 hours 0.0.0.0:44011->8983/tcp nightmar_solr_1
PS D:\Git\cassidydotdk\nightmar> docker inspect e94a75230acc

And find the IP address near the bottom of the inspect output.

1
2
3
4
5
6
7
8
9
10
"NetworkID": "5ae232363202af17ebd08220d6f09550d262dd23e03482a329d87e602deadd85",
"EndpointID": "556980706be5ec2a1298f5d3a87102cd52018972f82b1e91a7d2de79622880a8",
"Gateway": "172.22.32.1",
"IPAddress": "172.22.47.113",
"IPPrefixLen": 16,
"IPv6Gateway": "",
"GlobalIPv6Address": "",
"GlobalIPv6PrefixLen": 0,
"MacAddress": "00:15:5d:46:ca:22",
"DriverOpts": null

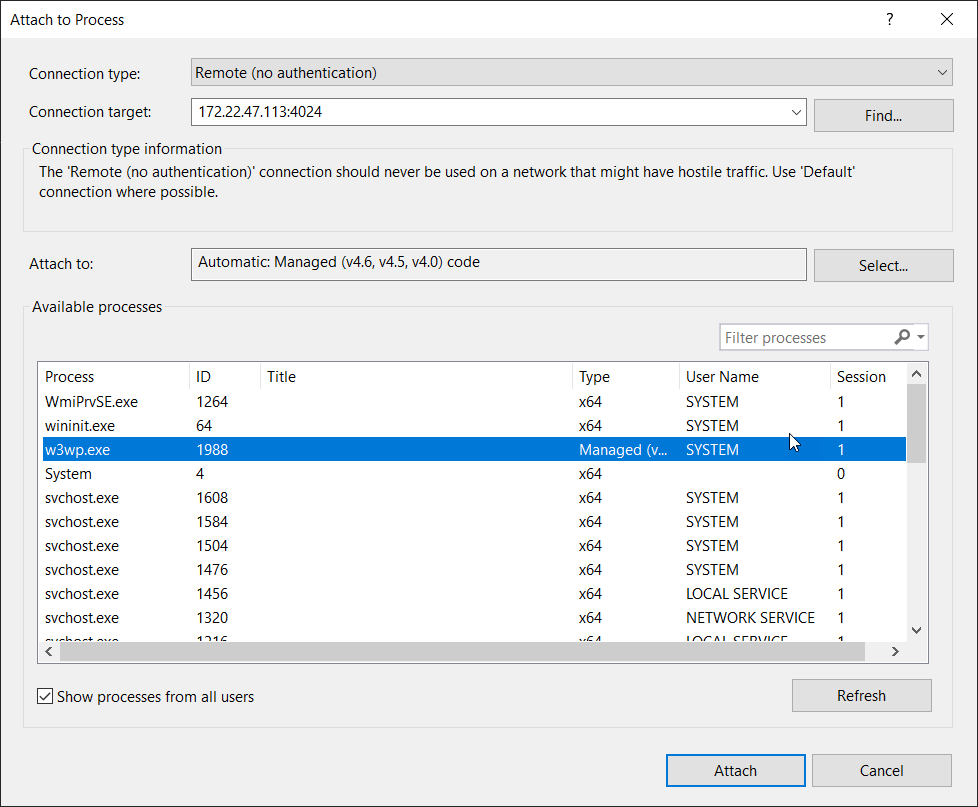
So 172.22.47.113 here. And then I know that the Visual Studio 2019 debugger listens on port 4024. If you’re running any other version, follow the link.

Right, so with this information in hand - 172.22.47.113:4024, it’s time to get debugging. In Visual Studio do Debug => Attach to process (so far, everything as per usual).

Then switch “Connection Type” to Remote (no authentication) and paste the IP address and port into the Connection Target field. Click “Refresh” (bottom right) and you should see something like this:

Neat huh? Am sure you can take it from here.

Summary

AKA when even the For Dummies version becomes a long text.

  1. Copy/paste the volume links and entrypoint into your docker-compose.yml file. Feel absolutely free to shamelessly steal mine from this post; I copied them from someone else.
  2. Publish your solution to .\deploy
  3. When you need to debug, attach to the remote instead of local

That’s it. You don’t really need to worry about much more than this. Well except how to set up Unicorn obviously 😎 - I’ll do a side-post about this tomorrow. You actually have enough information in this post to easily do it yourself. Spoiler: map .\unicorn to c:\unicorn, set <patch:attribute name="physicalRootPath">c:\unicorn\$(configurationName)</patch:attribute>, no filesystem watcher required.

[^1]:
If you’re using VSCode, you might have noticed that it comes with some extensions for Docker. If you expand the Docker icon, you can see your running containers. Right click one and go “Attach Shell” for an instant PowerShell command prompt inside the container. Run IPConfig to get it’s IP address. Very simple, and useful for a heap of other things as well.

Share

Setting up Sitecore Docker Images

Sitecore Docker for Dummies

Part 2, Tossing Sitecore into some (Docker) containers

No subscription required

This is part 2 in a series about Sitecore and Docker.

Keep in mind that most everything I write in these posts is simplified in one way or another. I figure; you either know more than me already - in which case you have no use for these posts. Or you’re like me - just starting out - in which case I can tell you, I didn’t need to know so it’s likely you won’t need to know either.

Prerequisites

Assuming you’re done playing with WordPress, I figure it’s time to get busy with some Sitecore. Having read various other “Getting started with Docker/Sitecore” posts out there, let me start by making a few things clear that caught me when I first began my journey.

  • No service subscription is reqiured. Not to Docker Hub, not to Azure, not anywhere.
  • This will not eat up all your precious disk space.

There are a few things that are required however, and there’s nothing I can do about that.

  • You will need to be a certified Sitecore developer with access to download from https://dev.sitecore.net/.
  • You need a valid license.xml file for Sitecore
  • You need to have Git installed.

BEFORE YOU CONTINUE

The community around Sitecore and Docker is growing. I’d like to think blog posts like these play some small part in that :-) BUT IT ALSO MEANS… some of the detailed instructions laid out in these posts here, no longer match directly with the processes and principles you can find today on https://github.com/Sitecore/docker-images. I CONSIDER THIS A GOOD THING in that it means the Community is coming together on this, improving things. It is a terrible thing, obviously, if you’re just starting out and just want to follow this guide.

So I’ve gone and copied the Sitecore Docker Images repository AS IT WAS at the time of writing these posts. If you really are completely new to Docker, I would suggest you clone this repository to get you started. Once you’ve gotten your bearings and know at least a little bit about how it all connects, check out the CHANGELOG (you need everything from August 2019 onwards) to get up to speed with the latest developments.

You can find my cloned repository here: https://github.com/cassidydotdk/docker-for-dummies.

Some (very) basic theory - grossly simplified

Last post we asked Docker for some images (for MySql and WordPress) and we launched up our containers using these images. If I was to write in detail about what an image is, this would no longer be a For Dummies approach to Docker. So instead, think of images like this.

  • OS Layer (Operating System)
  • Web Server Layer
  • .NET Layer
  • Sitecore Base Layer
  • Sitecore XP Layer
  • Sitecore ContentDelivery Layer

Each image (layer) has a dependency up the chain and is the diff between the dependencies and it’s current state. So you have an OS layer (Windows, Linux, whatever) and you then pile on top of this to get to where you want. Not entirely unlike how you pile up stuff on your newly installec PC when you first boot it up.

Ok so it’s really nothing like that, but it works as an abstraction. And is good enough to move on with.

What may not have been obvious (because we didn’t actually care or need to know), is that when we did the WordPress example, there were dependencies involved. It’s not like MySql and WordPress can run entirely without some kind of host. I don’t actually know or care which exactly, but I’ll bet there was some Linux involved.

With Sitecore - as you know - Linux will not get us going. At least not fully. We need Windows images and containers, and for that we need to tell Docker to switch mode from it’s Linux default.

Find Docker Desktop in your taskbar and make it switch to Windows containers (already done in this screenshot). Docker will restart and that will be that.

We also can’t download Sitecore images freely, like we could with WordPress. Bummer. I won’t get into this discussion here. But we’re going to have to build these images ourselves.

We’re now ready to build some Windows based images for Sitecore. So let’s get to it.

Building your own Sitecore images

Make no mistake, it is a significant amount of work, to configure and set up an environment to build these images. Fortunately for me and fortunately for us, there are already some enthusiastic community members doing a pile of this work for us. Give a shoutout to pbering and jeanfrancoislarente if you come across them for all the work they’ve just saved you from.

Open up your favourite command prompt and execute the following:

PS> git clone https://github.com/Sitecore/docker-images.git
PS> cd docker-images

A few words before you continue. This repository can build you Sitecore images for every version from 7.5 and up. I know, because that’s how I started :P And while that is all fine and well, it is likely

a) not necessary
b) too time consuming

So don’t do that. I don’t mean “have a bit of patience” type time consuming btw, I mean “1-2 days” time consuming. I don’t know exactly how long it takes to build the entire set of images, since I had to restart a few times. And I was also caught in the “you need a registry account” falsum so lots of time was spent waiting for pointless uploads.

Anyway. Pretty much all of the work is done for you. All you need to do, is set up a build script. Copy this, and paste it into a file you call .\build.ps1.

1
2
3
4
5
6
7
8
9
10
11
12
13
14
15
16
17
18
19
20
21
22
23
24
25
26
27
28
29
30
31
32
33
34
35
36
37
38
39
40
41
42
43
44
# Load module
Import-Module (Join-Path $PSScriptRoot "\modules\SitecoreImageBuilder") -Force

# Settings
$installSourcePath = (Join-Path $PSScriptRoot "\packages") # PATH TO WHERE YOU KEEP ALL SITECORE ZIP FILES AND LICENSE.XML, can be on local machine or a file share.
$registry = "local" ` # On Docker Hub it's your username or organization, else it's the hostname of your own registry.
$sitecoreUsername = "YOUR dev.sitecore.net USERNAME"
$sitecorePassword = "YOUR dev.sitecore.net PASSWORD"

$baseTags = "sitecore-*9.2*1903" # optional (default "*"), set to for example "sitecore-*:9.1.1*ltsc2019" to only build 9.1.1 images on ltsc2019/1809.

# Restore packages needed for base images, only files missing in $installSourcePath will be downloaded
SitecoreImageBuilder\Invoke-PackageRestore `
-Path (Join-Path $PSScriptRoot "\images") `
-Destination $installSourcePath `
-Tags $baseTags `
-SitecoreUsername $sitecoreUsername `
-SitecorePassword $sitecorePassword

# Build and push base images
SitecoreImageBuilder\Invoke-Build `
-Path (Join-Path $PSScriptRoot "\images") `
-InstallSourcePath $installSourcePath `
-Registry $registry `
-Tags $baseTags `
-PushMode "Never" # optional (default "WhenChanged"), can also be "Never" or "Always".

$variantTags = "sitecore-*:9.2*1903" # optional (default "*"), set to for example "sitecore-xm1-sxa-*:9.1.1*ltsc2019" to only build 9.1.1 images on ltsc2019/1809.

# Restore packages needed for variant images, only files missing in $installSourcePath will be downloaded
SitecoreImageBuilder\Invoke-PackageRestore `
-Path (Join-Path $PSScriptRoot "\variants") `
-Destination $installSourcePath `
-Tags $variantTags `
-SitecoreUsername $sitecoreUsername `
-SitecorePassword $sitecorePassword

# Build and push variant images
SitecoreImageBuilder\Invoke-Build `
-Path (Join-Path $PSScriptRoot "\variants") `
-InstallSourcePath $installSourcePath `
-Registry $registry `
-Tags $variantTags `
-PushMode "Never" # optional (default "WhenChanged"), can also be "Never" or "Always".

This is a slightly modified version of the original, found in the repository.

In all this, there are only 3 lines you need to modify.

1
2
3
$installSourcePath = "D:\Dropbox\Sitecore Versions"
$sitecoreUsername = "taylor@swift.com"
$sitecorePassword = "nomorecountrymusic"

Replace these variable values to fit your needs. Dump your license XML file into $installSourcePath, and put your Sitecore SDN user credentials (the account you can download with) into $sitecoreUsername and $sitecorePassword.

In this configuration, you’re set to build any and all Sitecore 9.2 versions and variants. That’ll do for now.

Let’s get this show on the road. (Make sure you have your license.xml in place)

PS> .\build.ps1

And off it goes. If there is interest, I could go into greater detail in a separate post about what happens now - but you don’t really need to worry much about it. Suffice it to say, the script now gets busy downloading Sitecore releases and building images based on them. It will pull in base images as neeeded (for windows and sql server and so on). Sit back and relax.

Depending on PC spec and network speed, this will take anywhere from 10 minutes to.. I guess an hour or so. Assuming you end up with green text, all is well and we’re ready to finally get to the good stuff.

Spinning up Sitecore for the first time

Right. The time for WordPress is over. Let’s do this. Thanks to the aforementioned Docker heroes, your hello world will be as effortless as previous examples. But instead of… yea… let’s go crazy and fire up a full scaled Sitecore XP. Complete with xconnect index processors and everything. Heck, let’s throw some SXA on it as well (which then obviously includes Sitecore PowerShell Extensions 5.0 and JSS 12).

Too much? not at all. Child’s play.

PS> cd '.\tests\9.2.0 rev. 002893\windowsservercore\'
PS> docker-compose -f docker-compose.xp.sxa.yml up

And your console is about to get very busy. It opens up like this.

1
2
3
4
5
6
7
8
9
Creating network "windowsservercore_default" with the default driver
Creating windowsservercore_sql_1 ... done
Creating windowsservercore_solr_1 ... done
Creating windowsservercore_xconnect-indexworker_1 ... done
Creating windowsservercore_xconnect_1 ... done
Creating windowsservercore_xconnect-automationengine_1 ... done
Creating windowsservercore_cd_1 ... done
Creating windowsservercore_cm_1 ... done
Attaching to windowsservercore_solr_1, windowsservercore_sql_1, windowsservercore_xconnect-indexworker_1, windowsservercore_xconnect_1, windowsservercore_xconnect-automationengine_1, windowsservercore_cm_1, windowsservercore_cd_1

Give it a short while if this is your very first run (might need a minute or two).

But don’t wait too long; “smiling asian lady” is waiting for you on http://localhost:44001. Go say hi 😎

If (when) you want to log into Sitecore itself, go to http://localhost:44001/sitecore and log in with the trusted admin/b credentials.

That’s it. No seriously. Well almost.

Just two small things to do; we need to get your Solr properly initialised. Open up Control Panel -> Indexing and execute the two following tasks:

  • Populate Solr Managed Schema (all indexes)
  • Indexing Manager -> Rebuild all indexes

A few extra things (encore)

Open up a new PowerShell (your old one is busy). A few commands of interest.

PS> docker container ls

Will give you a list of the XP instance containers you just brought to life.

1
2
3
4
5
6
7
8
CONTAINER ID        IMAGE                                                                COMMAND                    CREATED             STATUS                   PORTS                     NAMES
8d0502d19b42 sitecore-xp-sxa-1.9.0-cd:9.2.0-windowsservercore-1903 "C:\\ServiceMonitor.e…" 8 minutes ago Up 8 minutes 0.0.0.0:44002->80/tcp windowsservercore_cd_1
adeddff07172 sitecore-xp-sxa-1.9.0-standalone:9.2.0-windowsservercore-1903 "C:\\ServiceMonitor.e…" 8 minutes ago Up 8 minutes 0.0.0.0:44001->80/tcp windowsservercore_cm_1
60e224e76a32 sitecore-xp-xconnect-automationengine:9.2.0-windowsservercore-1903 "C:\\AutomationEngine…" 8 minutes ago Up 8 minutes 80/tcp windowsservercore_xconnect-automationengine_1
8c35b0e12dc0 sitecore-xp-xconnect:9.2.0-windowsservercore-1903 "C:\\ServiceMonitor.e…" 8 minutes ago Up 8 minutes 80/tcp, 443/tcp windowsservercore_xconnect_1
10650711905b sitecore-xp-xconnect-indexworker:9.2.0-windowsservercore-1903 "C:\\IndexWorker\\XCon…" 8 minutes ago Up 8 minutes 80/tcp windowsservercore_xconnect-indexworker_1
f9f3c36dc49b sitecore-xp-sxa-1.9.0-solr:9.2.0-nanoserver-1903 "cmd /S /C Boot.cmd …" 8 minutes ago Up 8 minutes 0.0.0.0:44011->8983/tcp windowsservercore_solr_1
40460ae5a753 sitecore-xp-sxa-1.9.0-sqldev:9.2.0-windowsservercore-1903 "powershell -Command…" 8 minutes ago Up 8 minutes (healthy) 0.0.0.0:44010->1433/tcp windowsservercore_sql_1

None of these containers have any sort of UI. But you can connect to the SQL server using SMSS as if it was any other SQL server. You can browse to http://localhost:44002 to find your CD server. You can even start a PowerShell inside it. Grab the CONTAINER ID for sitecore-xp-sxa-1.9.0-cd:9.2.0-windowsservercore-1903 and do

PS> docker exec -it 8d0502d19b42 powershell (replace with your own id)

And off you go.

1
2
3
4
5
6
7
8
9
10
11
12
13
14
15
16
17
18
19
20
21
22
23
24
25
Windows PowerShell
Copyright (C) Microsoft Corporation. All rights reserved.

Try the new cross-platform PowerShell https://aka.ms/pscore6

PS C:\> dir


Directory: C:\


Mode LastWriteTime Length Name
---- ------------- ------ ----
d----- 9/14/2019 2:18 PM inetpub
d-r--- 9/14/2019 11:35 AM Program Files
d----- 9/14/2019 11:35 AM Program Files (x86)
d----- 9/11/2019 12:00 AM RoslynCompilers
d----- 9/14/2019 2:18 PM Sitecore
d-r--- 9/10/2019 11:58 PM Users
d----- 9/10/2019 11:56 PM Windows
-a---- 3/19/2019 7:54 AM 5510 License.txt
-a---- 9/10/2019 11:59 PM 172328 ServiceMonitor.exe


PS C:\>

(a look inside your CD container)

PS> exit when you want to return to your host PowerShell session.

Once you’re ready to let go, you can tear all of this down again. Type in:

PS> docker-compose -f .\docker-compose.xp.sxa.yml down

And Docker will proceed to tear down all the containers.

1
2
3
4
5
6
7
8
9
10
11
12
13
14
15
Stopping windowsservercore_cd_1                        ... done  
Stopping windowsservercore_cm_1 ... done
Stopping windowsservercore_xconnect-automationengine_1 ... done
Stopping windowsservercore_xconnect_1 ... done
Stopping windowsservercore_xconnect-indexworker_1 ... done
Stopping windowsservercore_solr_1 ... done
Stopping windowsservercore_sql_1 ... done
Removing windowsservercore_cd_1 ... done
Removing windowsservercore_cm_1 ... done
Removing windowsservercore_xconnect-automationengine_1 ... done
Removing windowsservercore_xconnect_1 ... done
Removing windowsservercore_xconnect-indexworker_1 ... done
Removing windowsservercore_solr_1 ... done
Removing windowsservercore_sql_1 ... done
Removing network windowsservercore_default

Done 😎 No resdiual Solr installs, no leftover databases, no resources being consumed. It’s gone (sort of, more on that next time), until you call it all up again :-)

I think that’s enough for now. Until next time.

Share

Sitecore Docker for Dummies

Sitecore Docker for Dummies

Part 1, Docker 101 or Docker basics…

aka the Docker Post I wish someone had written before I had to. No servers, no service subscriptions, no configuration. Let’s just get into it.

This is part 1 in a series about Sitecore and Docker.

I’m not the first person to pick up new technology as it arrives. I’m really not. And while I’m writing today about Docker and this can hardly be called new by any standard, it is new to me. And it is new to a lot of the people I hang out with. So I’m just going to assume, it’s new to a lot of us.

What I won’t be explaining here

Seems odd to start with this, but I might as well get it out of the way. There are a lot of this around Docker that I do not fully understand yet. There’s even more that I probably will never bother to get fully into the details of. This weekend marks my first succesful experience with Docker, and I’ll explain how I got here to help you get here as well. Nothing more. Not now.

So expect some practical advise on how to get started; don’t expect any “why” or “what next”.

Without further ado…

So what’s Docker then? for dummies, obviously

How about I tell you what it’s for, to begin with. This is what will motivate you to read on.

Ever had problems getting your local Sitecore development environment up and running, in this post-SIM age? Ever struggled with getting the right certificates trusted, get that https:// connection to Solr going, get those durned Sitecore Commerce Business Tools installed correctly? Now ever tried to do all of the above in an identical consistent manner across a 5 man development team?

If you’re grinding your teeth right about now, Docker is for you.

Docker is a way for you to represent, configure, manage, and run all the infrastructure required to spin up a modern day Sitecore XM. Or XP. Or Publishing Service. Or all of the above. You don’t really need to understand the hows and the whys of this unless you’re tasked with actually setting up this infrastructure. For now let’s just focus on consuming it, the setting up bit is largely being done by a very enthusiastic Sitecore Docker Community - thank you so much for that :-)

So with Docker, you will be able to spin up all these services (in Dockeresque they’re called “containers”) that you need, like a SQL Server 2017 Developer Edition, a Windows with IIS and .NET, some .NET Core for your xConnect, and so on and so forth. By spinning up I mean getting these services up and running and interconnecting (in containers), allowing you to run your Sitecore as if you’ve already put in the hours, and blood, and sweat, and tears, of installation time and gotten your local environment running.

And once you’re done. Or you’re switching to another client. Or you’re taking off for the day. You just tell Docker to tear the whole thing down, and it’s gone. Nothing (almost true) is left over, your machine is “clean” again. Go ahead and switch to another directory where your other client project resides, this time on Sitecore 8.2 running SQL 2016 - not a problem. Spin it up and you’re on your way.

Great! How can I get started?

Let’s start with some basics. And a few assumptions.

  • I am on Windows 10 Pro build 1903. I will make no attempt to sugar coat this post to accomodate anything else (another way of me saying, I don’t know how to help you otherwise :D)
  • I have enabled Hyper V services in Windows. You need Intel Virtualization enabled in your BIOS for this. Google it if you have to.
  • I have chocolatey installed. So should you. This is no time to be afraid of the command-line.

Right let’s go. If not stated otherwise, I am assuming you run commands listed here in an elevated PowerShell Command Prompt.

Just to make sure we’re all set, start by relaxing your local PowerShell a bit. Chill.

PS> Set-ExecutionPolicy -ExecutionPolicy UnRestricted

Then it’s time to get Docker involved.

PS> choco install docker-desktop -y

I can’t actually recall if it forces a reboot on you at this point. In any event you are going to need to restart your PowerShell command prompt.

Once back, switch to somewhere you like (I use D:\docker-experiments but whatever floats your boat).

PS D:\docker-experiments> md hello-world
PS D:\docker-experiments> cd hello-world
PS D:\docker-experiments\hello-world>

And in keeping with time honoured tradition

PS D:\docker-experiments\hello-world> docker pull hello-world

If all is well, you should be pulling the docker image “hello-world” from the Docker Hub. I’ve done it a couple of times, so for me the output looks like this. Yours will vary a bit.

1
2
3
4
5
Using default tag: latest
latest: Pulling from library/hello-world
Digest: sha256:b8ba256769a0ac28dd126d584e0a2011cd2877f3f76e093a7ae560f2a5301c00
Status: Image is up to date for hello-world:latest
docker.io/library/hello-world:latest

Moment of truth

PS D:\docker-experiments\hello-world> docker run hello-world

Which should produce the following result:

1
2
3
4
5
6
7
8
9
10
11
12
13
14
15
16
17
18
19
20
Hello from Docker!
This message shows that your installation appears to be working correctly.

To generate this message, Docker took the following steps:
1. The Docker client contacted the Docker daemon.
2. The Docker daemon pulled the "hello-world" image from the Docker Hub.
(windows-amd64, nanoserver-1803)
3. The Docker daemon created a new container from that image which runs the
executable that produces the output you are currently reading.
4. The Docker daemon streamed that output to the Docker client, which sent it
to your terminal.

To try something more ambitious, you can run a Windows Server container with:
PS C:\> docker run -it mcr.microsoft.com/windows/servercore powershell

Share images, automate workflows, and more with a free Docker ID:
https://hub.docker.com/

For more examples and ideas, visit:
https://docs.docker.com/get-started/

It’s not much, I know. But since when was a “Hello World!” ever supposed to be much more?

Stepping up the game, run something real

I am not blind to the irony I am about to present you with. But I would really recommend your next step be, spinning up something real and useful (all things being relative) - and I want you to not worry about all the intricacies of what comes next, the building of images more complex than hello-world.

So instead I’m going to show you how to get WordPress up and running in just a couple of minutes 😁 I did warn you about the irony.

Introducing docker-compose

So for our hello-world example, things were quite simple. For an application such as WordPress, it gets slightly (only slightly) more complicated. WordPress relies on an underlying database server, in this case MySql. So to get things going, we’re going to need to spin up 2 containers - one for MySql and one for WordPress. Don’t worry about this for now, consider a docker-compose file much like a manifest or a service-order of things you’d like Docker to provide for you.

As we know, WordPress is Open Source, so images and docker-compose files are already made for us and freely available. For this example, I’m going to use this one.

Open up VSCode or whatever strikes your fancy, and paste this text in. Save it as docker-compose.yml.

1
2
3
4
5
6
7
8
9
10
11
12
13
14
15
16
17
18
19
20
21
22
23
24
25
26
27
28
version: '3.3'

services:
db:
image: mysql:5.7
volumes:
- db_data:/var/lib/mysql
restart: always
environment:
MYSQL_ROOT_PASSWORD: somewordpress
MYSQL_DATABASE: wordpress
MYSQL_USER: wordpress
MYSQL_PASSWORD: wordpress

wordpress:
depends_on:
- db
image: wordpress:latest
ports:
- "8000:80"
restart: always
environment:
WORDPRESS_DB_HOST: db:3306
WORDPRESS_DB_USER: wordpress
WORDPRESS_DB_PASSWORD: wordpress
WORDPRESS_DB_NAME: wordpress
volumes:
db_data: {}

Don’t worry too much about what’s going on here, but since this post is For Dummies, I’ll give you the Executive Summary:

Two services (containers) are requested:

  • db (MySql 5.7)
  • wordpress (latest version)

And a little bit of configuration

  • MySql is configured with some known passwords (don’t roll these out in production lol)
  • WordPress is configured with a dependency on MySql (db) and with matching passwords
  • Docker is instructed to map port 8000 to the WordPress container port 80

(I know I’m simplifying. That’s literally the point)

Right. Let’s spin this up. Don’t forget to save the file like I mentioned above.

PS D:\docker-experiments\hello-world> docker-compose up -d

You’re telling Docker to run your compose file (docker-compose.yml is the default filename, -d tells Docker to “let go” of it when fired up and give you your command prompt back).

You should see something like this.

1
2
3
Creating network "hello-world_default" with the default driver
Creating volume "hello-world_db_data" with default driver
Creating hello-world_db_1 ... done Creating hello-world_wordpress_1 ... done

Now wait a minute. Or two. WordPress and MySql are setting themselves up - this only happens the first time.

Then fire up a browser and go to http://localhost:8000 (remember, Docker was instructed to send that to port 80 on WordPress). You should see the following.

If you’re so inclined, go ahead and play around with WordPress for a while.

When you’re done, go back to your PS and instruct Docker to tear this whole thing down again.

PS D:\docker-experiments\hello-world> docker-compose down

For some reason, MySql takes a long while to shut down. But wait it out, and you should see this.

1
2
3
4
5
Stopping hello-world_wordpress_1 ... done  
Stopping hello-world_db_1 ... done
Removing hello-world_wordpress_1 ... done
Removing hello-world_db_1 ... done
Removing network hello-world_default

And voila. WordPress is gone and we can move on to bigger and better things :-)

That’s it for part 1. I hope this is of some use to you. Especially those of you who, like me, have been lurking around Docker for a while but never really mounted up enough momentum to actually take it for a spin.

Share

Rise of the Unicorn Transformers

Rise of the Unicorn Transformers

Before time began, there was…the Cube. We know not where it comes from, only that it holds the power to create worlds and fill them with life. That is how our race was born. For a time we lived in harmony, but like all great power, some wanted it for good…others for evil.

Wait a minute. That’s not it.

Meet something brand new however, please welcome a new addition to the Unicorn and Rainbow Family: Field Transformers. Well Field Transforms, I get carried away.

Here’s the TL;DR. Sometimes a config snippet speaks louder than a thousand words.

What is it?

It’s like this.

1
2
3
4
5
6
7
8
9
10
11
12
13
14
15
16
17
18
19
20
21
22
23
24
25
26
27
28
29
30
<!--
PREDICATE AND INCLUDE FIELD TRANSFORMS

- These transforms ONLY APPLY to what gets deserialized into Sitecore. Field values on disk/serialized datastore remain complete - respecting only the Rainbow field filter settings

IN OTHER WORDS:

Example: "-title, -text, +ApiUrl[{$apiUrlToken$}]" => All fields get deployed as normal, except "title" and "text". And "ApiUrl" gets a forced value.
Example: "!title, -text" => "Title" gets reset (to standard value), "Text" gets ignored.
Example: "?title, ?text" => ALL fields gets deployed, but fields "Title" and "Text" will only get their value deployed if target field value is empty
Example: "?title, ?text, !apiUrl" => As above, but field "apiUrl" is reset

"!field" => Reset this field unconditionally
"-field" => Ignore this field unconditionally
"?field" => Deploy this field if it has no value in target data store (Sitecore)
"+field[value]" => Force a new value into this field on target data store (Sitecore)
";field" => Force a "Lorem ipsum dolor" value into the field
":field" => Force a longer Lorem ipsum based HTML string into the field (around 2075 characters of Lorem Ipsum, broken up with <p> into sentences).
"$field[settingName]" => Grab the value of the Sitecore Setting `settingName` and force it as a value
-->
<predicate fieldTransforms=";Title,:Text,!Include In Sitemap,+Api Endpoint[{$apiEndPoint$}],?Default Product">
<include name="Sample Data" database="master" path="/sitecore/content/global/sample" fieldTransforms="-Title" /> /* Predicate transforms apply, but "Title" gets ignored on this include definition */
</predicate>


<!-- Clear Workflow fields on local development environments, but force a specific state upstream -->
<predicate>
<include role:require="Standalone" name="Sample Data" database="master" path="/sitecore/content/global/sample" fieldTransforms="!Workflow,!Workflow State" />
<include role:require="ContentManagement" name="Sample Data" database="master" path="/sitecore/content/global/sample" fieldTransforms="+Workflow[{2DE02B52-B95F-404A-A955-C36B290F1B57}],+Workflow State[{5ACE9C7F-8A18-4C77-BC30-03BE5A40E6B6}]"/>
</predicate>

But what is it?

It’s a quality of life enhancemment. While I do not encourage it, I’ve often been met with questions like these:

  • “How can I prevent just this field being deployed?”
  • “How can I make sure this configuration value doesn’t get reset to development settings on each sync?”
  • “How can I make sure this field value doesn’t overwrite what the Content Editors entered?”

If you’ve been asked (or asked) any of these yourself, this is for you.

The intended use-case(s)

  • Keeping certain fields under Source Control, but not letting them “bleed” across to other developers. For instance “Workflow” and “Workflow State”.
  • When deploying content (example content or otherwise) to an upstream environment, an easy way to ensure a specific workflow and state is set/reset on the content items.
  • When deploying, make sure certain field values are only updated if they do not hold active content on the target environment.
  • A way to inject configuration values into Sitecore field values, for use in CI and CD pipelines.

And then you tell me. There are likely tonnes of ways people would want to use this feature, more than I’ve considered. I’ve just provided some new tools - I’ll leave it to you, how to best use them.

Cool. So how do I use it?

Your <predicate> and <include> nodes now accept a new optional attribute; fieldTransforms. I wanted to keep the configuration very light weight and reasonably intuitive, so that’s all you get. At least for now. If the feature takes off, I’ll look into making something more plug-able and expandable.

Field Transforms only affect what gets written into Sitecore. All other operations remain the same - they do not affect what gets written to disk, they do not affect FieldFilter definitions. This is simply a value-replacer on the pipeline between Filesystem and Sitecore.

Example 1

1
2
3
<predicate fieldTransforms="-Title,-Text">
<include name="Content" database="master" path="/sitecore/content/home" />
</predicate>

For all <include>, never deploy the fields Title and Text to Sitecore. Well technically to the sourceDataStore, but this will be Sitecore for 99.99% of you.

Example 2

1
2
3
<predicate fieldTransforms="-Title,-Text">
<include name="Content" database="master" path="/sitecore/content/home" fieldTransforms="+Title[My Forced Title Value]" />
</predicate>

As Example 1, but the "Content" <include> overrides the <predicate> and forces a value "My Forced Field Value" into the Title field.

Example 3

1
2
3
<predicate>
<include name="Content" database="master" path="/sitecore/content/home" fieldTransforms="+Title[My Forced Title Value]" />
</predicate>

As Example 2, but this time there is no <predicate> field transform. All fields will operate as normal, except Title which will get a forced value of "My Forced Title Value".

Nice. What field transforms are available?

Bit of a mixed pot, really.

  • -: Never deploy this field
  • ?: Only deploy this field if there is no value (can be standard value however) in the target field
  • !: Always reset this field (to standard value)

These are the 3 I probably see being most useful. But it doesn’t stop here.

  • ;: Forces the value ""Lorem ipsum dolor"" into the field
  • :: Forces a much longer (2075-ish characters) Lorem Ipsum string into the field (with <p> tags)
  • +[val]: Forces "val" into the field. E.g. +Title[Optimus Prime] will force the value "Optimus Prime" into the Title field.
  • $[setting]: Forces the value of Sitecore.Configuration.Settings.GetSetting("setting") into the field.

Intended use-case for +[val] could be for your build pipelines; e.g. +My Super Service EndPoint[${superServiceEndpoint}] wil force the value of ${superServiceEndpoint} into the field. Assumption being that you’ve run something like a token replacer in your build pipeline and replaced the actual value in the Unicorn configuration file.

Caveats, and gotchas

So here’s the tool. How you use it, is up to you. But be aware of some (perhaps obivous) caveats.

  • It won’t work with Transparent Sync. Transparent Sync never actually writes anything to Sitecore and therefore won’t ever pass by these Field Transforms.
  • If you force a field value (e.g. with + or $) on a versioned field - the field value will get forced onto all versions of the field. All versions, all languages.
  • It does work with Dilithium
  • Remember; it Field Transforms ONLY apply to field values being written to Sitecore. Everything serializes as before - yaml files are not affected by these transforms.

Can I get it now?

Yes. Yes you can. At the time of this writing, Rainbow 2.1.0-pre1 and Unicorn 4.1.0-pre1 have been pushed to NuGet. I still consider it a pre-release until a few more people have had a chance to take it out for a spin.

Please join our Slack Community at https://sitecore.chat/ and join the #unicorn channel if you’re taking this out for a spin. Would love to hear your thoughts and get your feedback.

Share

It's time to put fast:/ query to rest

It’s time to put fast:/ query to rest

It’s been 8 good years. Well it’s been 8 years. It’s time - it’s way overdue in fact - that fast:/ is retired. I’m getting tired of debating and explaining the same thing over and over again on our Community Slack channels, so I figured I would write this post so as to - once and for all - try and rid the Sitecore community of this fast:/ pestilence.

It’s going to be a semi-long post. I apologise. Read it anyway.

TL;DWR: Stop using fast:/ query.

The history

Sitecore Information Architecture Anno 2005-2012ish

So I’ve been around long enough to remember, what fast:/ was introduced to solve. Join me on a trip down memory lane to the days of Sitecore 5 and 6.

Back then, the way we built Sitecore solutions was very different than what we see today. We were building page templates. Datasources was not commonly used and understood so we all, more or less, built our Sitecore sites in a way that every single field on a page would be represented on the page item. I know right? Unthinkable today. But we did. So we did use inheritance, we micro-managed template inheritance and often ended up with field names such as Section Subheading Bottom Right and Product Spot 3 Inner Subheading. I know, right?

Ignore for now the nightmare it was to refactor an Information Architecture such as this (which led to the also-obsolete practice of always addressing fields by their ID instead of their name - back then we had to change names quite often for the whole thing to make any sense to our content editor users). Anyway - ignore all this. We’ve all moved on, but this is how most of us did Sitecore Information Architecture from 2005 to somewhere around 2012/2013 or so. I know, because I vented about it in a blog series in 2013 called The Page Template Mistake.

The Content Editor Performance Problem

Other problems aside, there was a massive performance drawback from approaching Sitecore IA like this. And it came from the only editor available to us at the time - the good old trusted Sitecore Content Editor which stands, to this day, pretty much as it did back then. And then we had these Page Templates. 50 or so fields was not uncommon at all. And not just simple fields mind you, but Droplists, Droplinks, TreeLists and so on. All of them being populated by the source field of their respective field definition items on their respective templates.

And now we’re getting to it; the Content Editor simply could not cope. Switching between an item meant, Sitecore had to go execute all of these queries to fill the Droplists, TreeLists and so on, and both CPU and memory resources were a lot more limited at the time. Sitecore’s caches hadn’t quite evolved to what they are today, CPUs were single or dual-core (Core2 Duo was the latest and greatest). It just wasn’t really handling the job very well.

We needed a quicker and faster (pun sort of implied) way of being able to query these source definitions to fill our Droplists and TreeLists, and that should be easy enough right?

Since we only need the ID and the Item.Name in order for an item to be populated into one of these lists - surely a shortcut could be found. And a shortcut was found. It took a lot of shortcuts (since it needed only the above; the ID and the Name), scaled horribly (but that was alright, this was just to improve the Content Editing experience of a single CM user), ignored Versioning, Language, maybe even Workflows (I forget) - again, all of this was an acceptable trade-off for a faster Content Editing experience.

And thus, Sitecore fast:/ query was born. To my knowledge with Sitecore 6.2, but could have been slightly sooner than that. I can’t find the original blog posts that discussed all of this, nor the Sitecore Forum posts.

Here is the original documentation cookbook: Using Sitecore Fast Query

The Limitations of Sitecore fast:/ query

Bypassing Sitecore’s Data Provider Architecture

So keeping in mind the above; fast:/ was designed to solve a single-user performance problem when the Content Editor had lots and lots of Droplists and TreeLists and so on to populate. I’ll extract some basic facts about fast:/ - all of which can be found in the cookbook documentation referenced above.

Under the heading: “Sitecore Fast Query has the following benefits compared to the standard Sitecore Query:”

Improved performance — queries are executed by the SQL engine and as a result the scalability and performance of the SQL engine is not limited by.NET or by Sitecore.

Let me translate that for you. “We’re pushing the load away from the web server and down onto the SQL server, so only the SQL server performance affects how fast your fast:/ query performs. Not the lack of caching in the Sitecore Content Editor, not the memory restraints of the web server”.

In other words; SQL now becomes your only bottleneck. But that’s not a problem right? Is just a single user editing some content, they don’t switch between items THAT often.

Consumes less memory — Sitecore Query loads every item that it touches into memory (cache) and this can fill the cache with unnecessary information. Sitecore Fast Query only loads the items from the result set and this minimizes the pressure on the cache.

Indeed. Using fast:/ bypasses such resource hogs as caches. Data caches, item caches. Because who needs them? It’s just a Content Editor user switching between an item once in a while, and since we’re constantly editing the content - caches don’t make any sense anyway.

Fundamentally, fast:/ works like this:

Sitecore Fast Query is translated to SQL queries that be executed by the database engine.

So it takes the query format and converts it into an SQL SELECT statement. Slightly simplified, but close enough. Cool right? Yea except this means bypassing the entire DataProvider architecture model of Sitecore, Item Cache, Data Cache and whatever else is required in a scalable solution then and today.

But that’s ok because it’s just a single Content Editor user switching between items once in a while. Right?

Because of this SQL conversion, only certain attributes are supported. And any complex operations that involve field values of any kind - very quickly degenerate into SQL queries so terrible your SQL Performance Profiler will have nightmares about them for years to come.

There are further limitations not called out in the original document.

  • No support for Language Fallback
  • In fact no Language support at all
  • Sort Order not respected
  • Versions not respected
  • Add more here if you like, the blog accepts PRs

The Scalability Problems of Sitecore fast:/ Query

So fast:/ was never designed to scale. It remains as I have stated numerous times already, a technology that was meant to be utilised by a single Content Editor user switching between items in the Content Editor to (d’uh) edit content.

So what do you think happens, when you put fast:/ queries in your reqular runtime code that executes your website? Remember what I quoted above?

queries are executed by the SQL engine and as a result the scalability and performance of the SQL engine is not limited by.NET or by Sitecore

And here’s the kicker. Almost every blog I’ve ever read, that in any way deals with query performance (including some of these from my References section below) - only measure performance of various query types in a single-user environment. And if there is one thing you cannot do with fast:/ query, is get a handle on it’s performance in that kind of setup. Your live website will be running 50? 100? 200? 400? 800? concurrent sessions. And not only that; this will not be users “switching from item to item once in a while, while editing content”. No they will click and click and mercilessly request new pages, new content, all the time. And expect to get it instantly, too.

So I ask of you this. A technology introduced to improve the Content Editor performance of a single user switching items from time to time while editing content; now being used say… twice per component on your page, 15 or so average components per page, 800 concurrent sessions each requesting a new page every 10 seconds on average. 2400 fast:/ queries per second, bypassing any and all caching and going straight to your SQL server as inline SQL (no stored procedures, no prepared SQL Execution Plan) - 2400 of those per second - how well do you think that is going to work out?

This is NOT what fast:/ was designed to do. Not ever. Neither was your SQL server, for that matter.

And if you don’t want to believe me, ask your SQL server. Also don’t forget to include a mention for your hatred for Item Cache and Data Cache when you submit your next request to your CTO or whoever, for an upgrade in your Azure storage tier. MOAR SSDs right? Solves any problem.

Sitecore fast:/ does not scale. Be VERY aware of this. Even when you’re “performance testing” on your local machine, it might actually come out looking “allright” performance wise. But it just isn’t “allright”. Never. You have to believe me; 13 years I’ve been doing this (Sitecore stuff) - never once have I seen a benefit from a fast:/ query. Nor have I ever ever used one myself; which at least goes to argue that they by no means are essential.

But Then What?

You know what. Since Sitecore 7.0, Sitecore ContentSearch has been built-in to the product. There is nothing you can fast:/ query that you cannot also query using Sitecore ContentSearch - only you’ll get your results about 10 times quicker (notice how I didn’t say faster…) that way. And it scales.

Ignore made-up problems

Ignore made-up problems such as:

  • “I need a real-time view of my data for this operation”. You don’t - this is an architecture problem/fail.
  • “I really need a fast way to find all items of template XXX under this subtree”. Yes. ContentSearch them. And make a better Sitecore Information Architecture.
  • “Calling up an index to get just a few items is overkill”. It isn’t. It just isn’t. It is by many orders of magnitude quicker than selecting just 1 field from 1 row in your SQL server, bypassing all caches.
  • And if you insist, use the LinkDatabase. Most fast:/ I see anyway, is “Get me all items of template XXX at this location”, and LinkDatabase outperforms fast:/ by 10x or more for this operation.
  • “I don’t want to update my local indexes all the time”. Then why do it? I don’t. My indexes update normally, so do yours. It’s only when you’re changing index configuration such as adding new computed fields and so on that a full rebuild of your index would be required.

I Don’t Believe You

Well then don’t. I have no problem being called on-site as a “Super Hotshot Sitecore Performance Troubleshooter”, fixing a few of your broken fast:/ queries and billing your boss a months salary for it. We all got to make a living somehow.

That said; I also want to put proof behind all of this. Thing is - to well and truly set up a test that measures the real impact of fast:/ query under load, is NOT as simple as it may seem. I will try and see if I can get one of Sitecore’s hosting provider partners to help set up a test rig, fill it with appropriate content, and then query the night away. Send me your favourite fast:/ queries if you like, I’ll be happy to include them in the test.

Any volunteers, feel free to reach out. Otherwise I’ll come knocking.

And Help Spread The Word

fast:/ is like the pestilence that just won’t go away. It is so deeply ingrained in the consciousness of many Sitecore Developers (and even - sigh - Sitecore Trainers) and it comes with a flashy fast:/ prefix. Must mean it’s… fast, right? Wrong.

Help spread the word by retweeting this post; add a few words of your own. If nothing else, just do something like “I’m name and I approve of this message”. Or whatever. But let’s help each other out, yea? :-)

I will embed your tweets below.

References

Tweets

Share